Your email is the key to your Instagram account. It’s where you receive security alerts, login verifications, and important updates. If your email is outdated or compromised, you might struggle to recover your account if anything goes wrong. That’s why it really gets important to change your email on Instagram!
That’s why knowing how to change your email on Instagram is crucial for keeping your profile secure. With Instagram ranking second in hacking incidents, averaging over 36,000 hacked accounts per month, securing your email is more important than ever.
In this guide, we’ll walk you through the step-by-step process to change your email on Instagram, whether you’re using the mobile app, desktop, or need to update your Instagram contact email in your bio. Let’s dive in!
Can You Change Your Email on Instagram?
Yes, you can easily change your email on Instagram! Whether you want to update your login email or add a new Instagram contact email in your bio, Instagram allows you to make these changes in just a few steps.
Your email is linked to your privacy settings & information, helping you manage who can access your account. Keeping your email updated is crucial.
It helps secure your account, ensures you receive important notifications, and makes it easier to recover your account if you ever get locked out. If you’re a business or creator, adding your contact email in the bio makes it easy for potential clients or followers to reach you.
In the sections ahead, we’ll guide you through the exact steps to update your email on mobile, desktop, and even without logging in. Let’s get started!

How to Change Email on Instagram Using Mobile App?
Updating your email on Instagram’s mobile app is quick and simple. Follow these steps to ensure your account stays secure and up to date.
Step–1: Go to Your Profile
- To begin, make sure you have the Instagram app installed on your device. Once it’s up and running, log in using your username and password if you’re not already logged in.
- Once you’ve successfully logged in, find your way to your profile. You can do this by tapping on the profile icon located at the bottom right corner of your screen.

- With a single tap, you’ll find yourself on your Instagram profile page, ready to make the necessary changes.
Step–2: Access Settings
- On your profile page, look for the three horizontal lines – often referred to as the hamburger icon – situated at the top right corner of your screen.
- The “Settings and Activity” menu will gracefully slide into view.

Step–3: Edit Profile
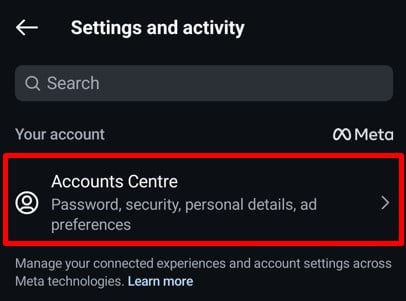
- With the Settings menu at your fingertips, tap on the “Accounts Center” option. This will lead you to a new set of choices.
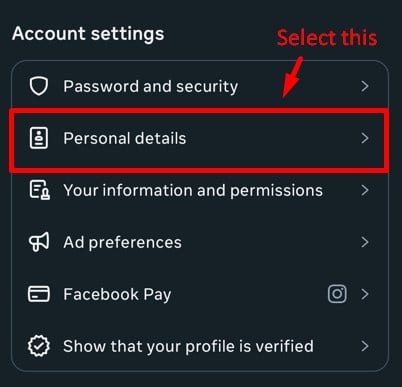
- Find and select “personal details” under the Account Settings section. Now you’re in the driver’s seat, ready to fine-tune your account details.
Step-4: Delete Existing Email
- Inside the “Personal details” section, you’ll spot the “Contact info” option. Click on it.
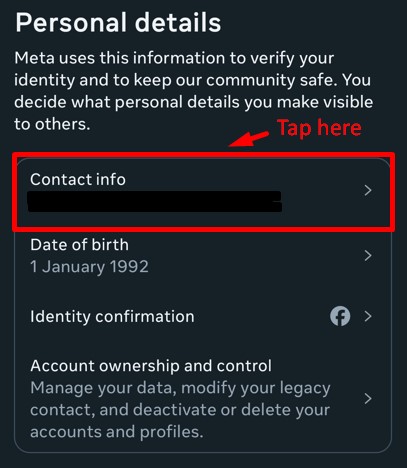
- Look for your current email and click on it to delete your email with the Delete email button.
- You’ll be asked to provide your Instagram account’s password. Enter it and click on continue. Your existing email will be successfully deleted.
Step-5: Add The New Email
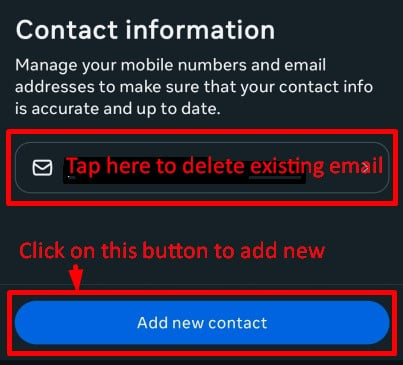
- Now, in order to add the new one, go back to the Contact Info page and click on Add new contact.
- Click on Add email address. Provide your new email address and select the Instagram accounts for which you want to set this email. Click on Next.
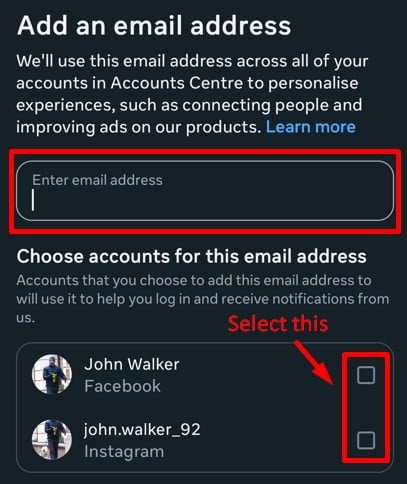
Step-6: Confirming The New Email
- After providing your new email, enter the confirmation code received on your new email and click Next. Your Instagram email will be changed.
That’s it! You’ve successfully changed your email on the Instagram app. This ensures that you receive important updates, notifications, and password recovery options linked to your new email.
Use Predis.ai Instagram Post Maker to effortlessly create stunning visuals and engaging content, ensuring your Instagram presence is always top-notch.
How to Change Instagram Email from Desktop?
You’ve already observed the process of changing your Instagram email using your phone. But what if you need to change the Email through your computer or your desktop? We’ve got you covered. Simply follow these steps:
Step-1: Log in to Your Instagram Website
Start by opening the Instagram website in the browser of your computer/desktop. Now log into your Instagram account by adding your username and password.
Step-2: Open settings
Once your account is open, look at the bottom left of your page. You will see more in the bottom left corner. Click on More and select Settings from the menu that appears in front of you.
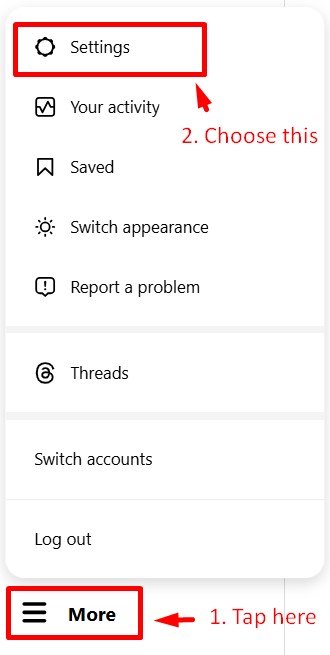
Step-3: Access Account Center
Now you can see the Account Center option that you will see at the top. From here you need to select See More in Accounts Center which you will find below the ad preferences.
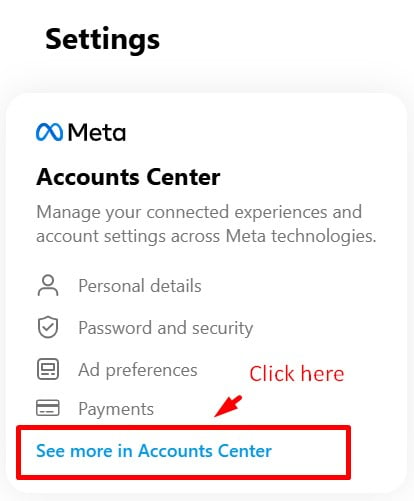
Step-4: Personal details
You are one step away from changing your email through your desktop. Now you just need to click on Personal details which will be followed by Contact info on the right side.
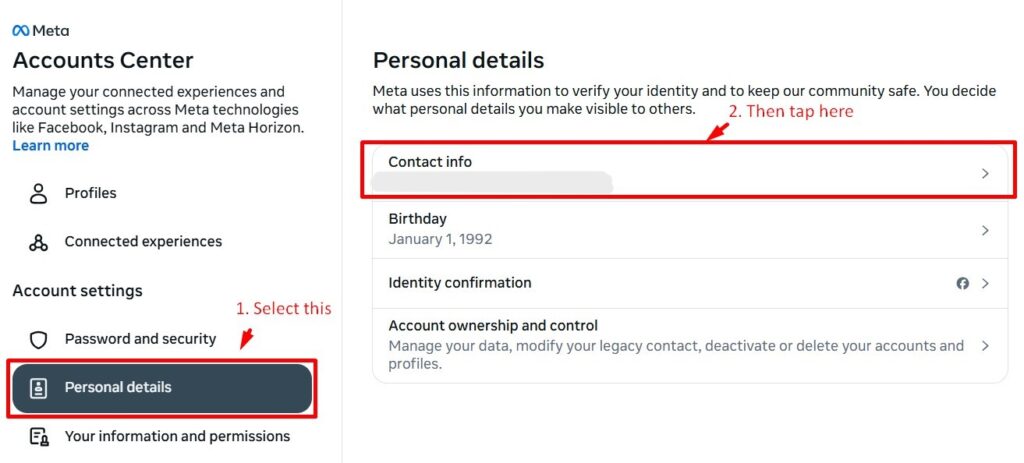
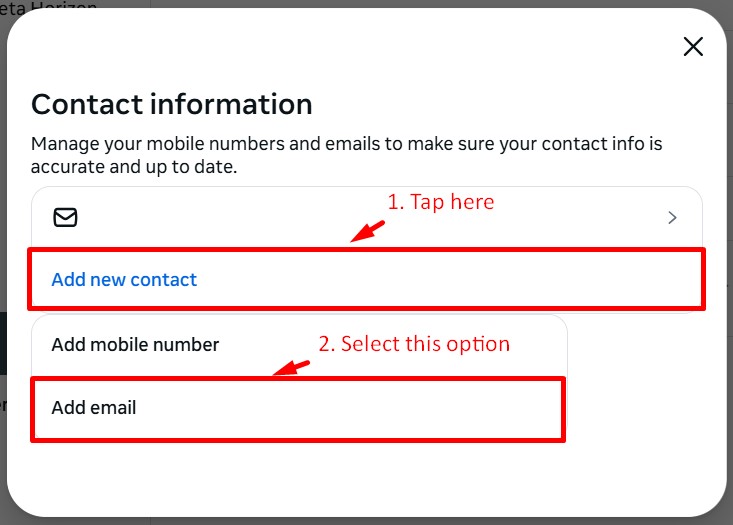
Step-5: Add new contact
This brings you to the page where the actual action takes place. Now you will have to select Add new contact which will be followed by Add Email.
Step-6: Change Email
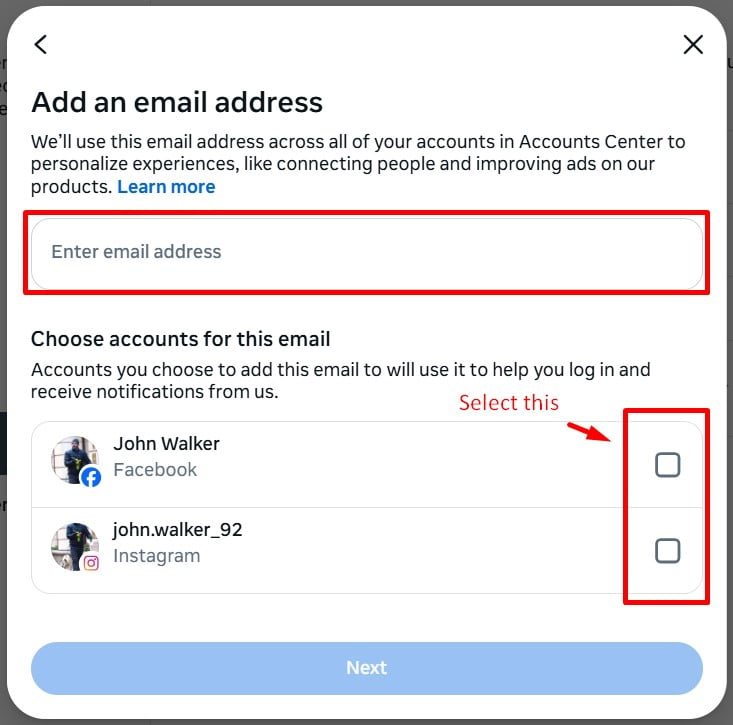
Finally, it’s time to add your desired email address that you want to be changed from the previous one. Enter the email address in the given tab. You will also need to select the Instagram account at the bottom. In case there are multiple accounts, select the accounts you want to run with that email address and click on the Next button.
Step-7: Confirm Email
When everything is done, you can now confirm your new email address. And this will finally update your Instagram email address through your computer.
So now, you know how to change your Email on Instagram through your phone as well as your desktop. But what about the login process? Suppose you want to change your Instagram email address at the time you log in. Now this may be due to various reasons, but it is a possible process.

How Do I Change My Email on Instagram Without Logging In?
Do you need to change your email address on Instagram without logging in? Well, it is not an impossible task. In fact, there are just a few steps that you need to follow to get it done.
Given below are some easy steps that will help you change your Instagram email without a password or without logging in:
Step-1: Forgot Login Details?
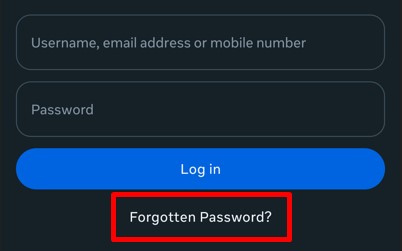
To begin with the process, you first need to Install the Instagram application on your device. Before adding your password, click on the “Forgotten Password?” At the bottom of your screen.
Step-2: Enter Username
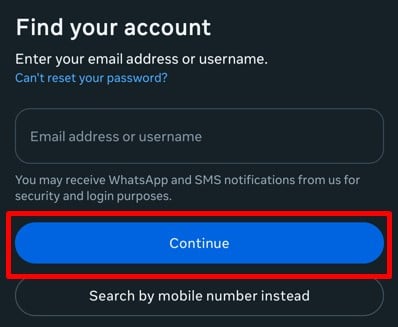
Now, here you need to enter your user name and then move ahead by selecting the next button at the bottom.
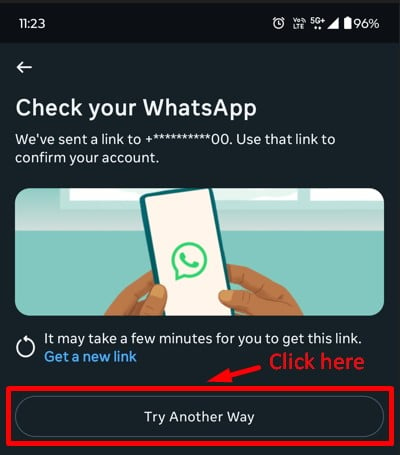
Step-3: Try Another Way
Here, you will be able to see “Try another way” at the bottom of the screen, select it and it will take you to a support request page.
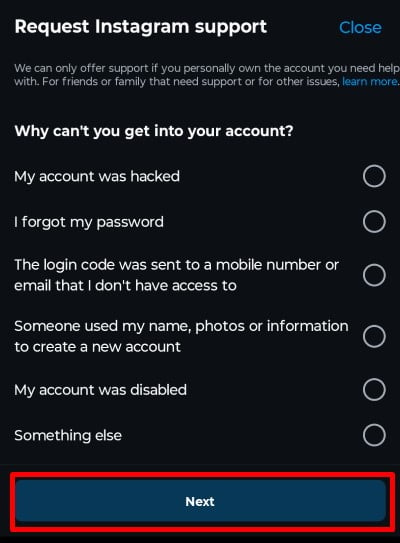
Step-4: Support Request
Now, you can fill out this form and submit a Request support to change your email address without logging in.
So this was an easy procedure to help you change your Instagram email address without logging in to your Instagram account. Other than changing the email for your login purpose, you can also change the email that is displayed for your viewers. So let’s read ahead to know how can it be done.
How to Add Instagram Contact Email in the Bio?
So as you know the email button on Instagram will show your users how can they contact you through email. This is why you will need to add an email button to your professional Instagram account if you want your viewers to contact you via email. Then, you need to make sure that the contact information you share with your audience only includes your email ID.
Now, what if you want to change the email address shown in your Instagram bio? All you need to do is follow these simple steps that will help you change the email in your bio:
Step-1: Click on the Profile Icon
First, you need to open your Instagram account. Now from your home page select your profile icon on the bottom right corner.
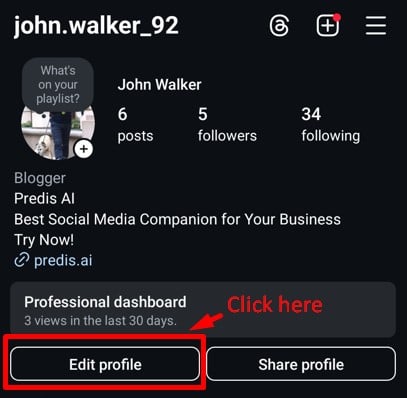
Step-2: Edit Profile
Now from your profile page, you need to select the “Edit profile” button that you see below your bio.
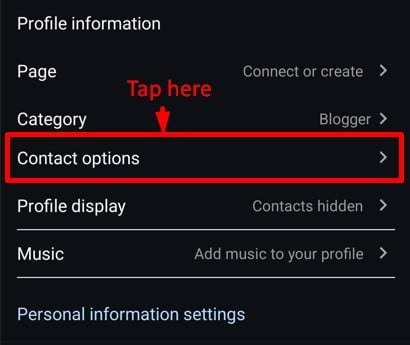
Step-3: Profile Information
Scroll down to where you will find the Contact options. Now select the contact option.
Step-4: Public Contacts
Now from here, you will be able to see the already-added email address that you gave earlier. Now to change it, replace the existing email address with the one you want.
Once your desired email address is added, click on the display contact info at the bottom. This will allow you to display your changed email address to your viewers in the bio. Now, select the blue tick at the upper right corner.
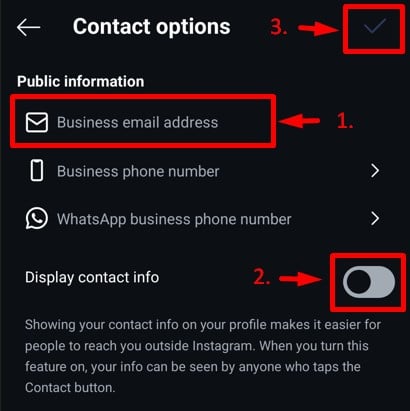
You are done now. The email button on your bio will now show your viewers the new email address that you changed from the previous one.
Why Change Your Instagram Email?
In the dynamic realm of Instagram, your Instagram username plays a crucial role in shaping your online identity. Quick Instagram username updates can make a world of difference. Here’s why it’s worth considering:
- Account Security: Imagine reinforcing your digital stronghold with a simple email switch. By regularly updating your email, you’re not only enhancing your account’s security but also ensuring a swift recovery if a password hiccup occurs.
- Instagram Notifications: Think about your Instagram notifications. Changing your email might affect the way you receive important updates and alerts from the platform. Make sure to adjust your notification settings accordingly after the email change.
- Personal Preference: Life evolves, and so do our email preferences. Whether you’ve adopted a new email persona or left an old one behind, aligning your Instagram with your current choice ensures seamless communication in your inbox.
- Professional Use: For those steering their Instagram journey towards professionalism, switching to a business email elevates your virtual handshake, setting the tone for fruitful networking and collaboration. So, consider updating your Instagram username for a more secure and personalized online presence.

Conclusion
In a world where hashtags and double-taps shape our digital lives, there’s one tiny hero often overlooked – your email address. It’s the key to your Instagram universe, helping you regain access, stay updated, and securely cruise through your account.
So, as we wrap up this guide, remember this: keeping your email current is like giving your account an invisible shield. Whether you’re beefing up security or just giving your profile a fresh vibe, changing your Instagram email is a breeze.
Keep your digital world secure and vibrant with these simple steps and the right tools at your disposal. If you want to make your Instagram marketing effortless, then do visit Predis.ai today to make your content creation and management easy and safe with the help of AI!
You can also use the Hashtag Generator to discover the most effective hashtags for your posts, boosting your reach and engagement.
FAQs
Yes, you can use the same email for multiple Instagram accounts, but each account must have a unique username. However, using a different email for each account is recommended for better security and easier recovery if you ever forget your login details.
Once you change your email, Instagram updates it instantly. However, you must first confirm the new email by clicking the verification link sent to your inbox. If you don’t verify it, Instagram won’t update your email.
If you haven’t received the confirmation email, try these fixes:
– Check your spam/junk folder to see if it landed there.
– Ensure you entered the correct email address without typos.
– Wait a few minutes, as sometimes emails can be delayed.
If the issue persists, resend the confirmation email from Instagram settings.
Yes, but only if you still have access to your old email. On the login page, tap “Forgot password?” and follow the instructions to reset your password using your email. If you don’t have access to your old email, you’ll need to go through Instagram’s support process to verify your identity and recover your account.
Related articles,
Automate Instagram Content Creation With the Help of AI
How to Create a Brand Identity on Instagram?
How to Promote Restaurant on Instagram?


