

Explore this content with AI:
Social media has become an integral part of our communication, connectivity, and even expression. From sending well wishes and announcing milestones to staying in touch with people we cannot meet in person, 62% of people worldwide use social media.
The world’s largest platform, ideal for every one of these reasons, is Facebook. The platform also helps breathe life into your past in the form of a visual storyboard called the Facebook Timeline. This feature allows users to share their stories and experiences with their Facebook friends and is a great way to stay in touch with friends and family and learn about what’s going on in their lives.
This article will guide you through how to see your timeline on Facebook and provide key tips on how to make the best use of this feature. So, let’s dive right in!
What is Timeline on Facebook?
A timeline on Facebook is a space where you can share your thoughts, photos, and life events with your friends and family. It is essentially a digital scrapbook of your life, where you can post updates, photos, and other content for your friends to see.
The Facebook Timeline can also be used to relive memories and share plans. It allows you to connect and share with different people without feeling estranged. When you do have the time to catch up in person, it’ll be like you never stopped talking.
Some of the features of a Facebook Timeline are:
- Your posts, such as photos, videos, and posts you were tagged in.
- The activities, such as likes and comments.
- Milestones that you shared.
- Recall memories on a later date.
- Privacy settings.
- Checking in from a different location.
- Fun GIFs and so on.
Your Facebook Timeline is divided into a section at the top for your profile picture and cover photo, and another below for a feed of your recent activity.
Your profile picture is a small image that represents you on Facebook. The cover photo is a larger image that appears behind your profile picture and can showcase your personality or interests.

Facebook Timeline Checklist: How to Optimize Your Business Page
We’ve prepared a clear and concise checklist for those looking to optimize their Facebook business page. Follow these steps to ensure your page is fully optimized.
1. Choose a High-Quality Cover Page
A cover photo is a large background image that stretches across the top of your Facebook page. Since it is the first thing people notice, you can set your brand’s tone with a high-quality image. The ideal dimensions of a cover photo are 851 pixels by 315 pixels. Anything less than or greater than these dimensions will make the image blurry or pixelated.
Additionally, make the image as creative as possible to appeal to your potential audience. Update your cover photo often to increase your engagement rates.
2. Upload a Clear Profile Photo
This image will be displayed next to your status updates and other posts. Therefore, use a clear picture that establishes your brand identity, even if scaled down. The ideal dimension should be 170 x 170 pixels, but 800 x 800 pixels is recommended for the best quality. Make sure the image is made with these dimensions in mind.
3. Check Your Business Classifications
To get maximum visitors and engagement for your business page, make sure it is classified correctly. Also, check that your contact information, address, and business hours are accurate.
4. Create Milestones to Celebrate Significant Events
Consider Facebook Timeline as a digital chronicle where you can create an engaging storyline. So, create milestones on your timeline to celebrate newsworthy events such as upcoming sales, grand openings, or special awards. After an overview of how it can be optimized, let’s move on to how to see the timeline on Facebook.
How Do I See My Timeline on Facebook?
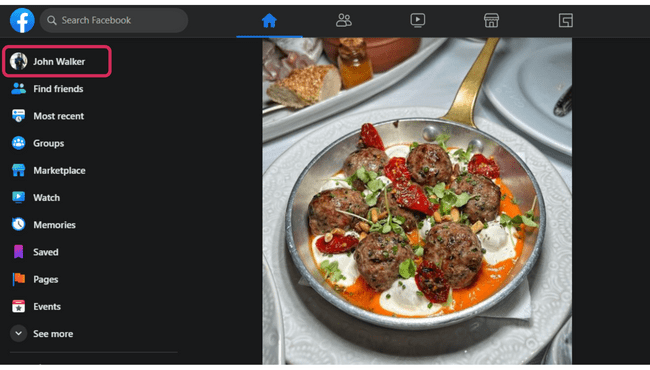
To access your timeline on Facebook, log in to your account and click on your name in the top left corner of the screen.
On the web:
- Go to www.facebook.com and log in to your account.
- In the top left corner of the screen, click on your name.
- This will open your timeline, where you can view and edit your profile information and view a feed of your recent activity.
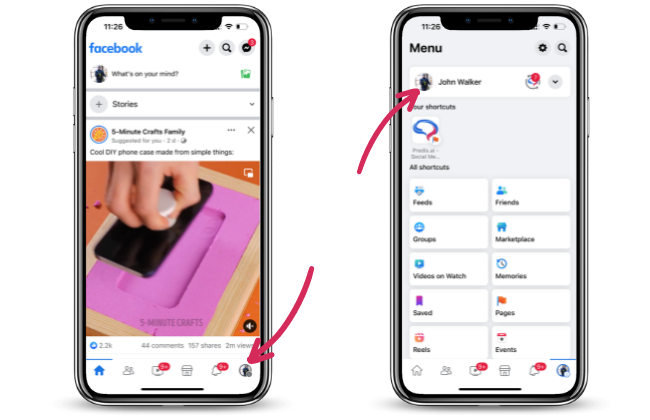
On mobile app:
- Open the Facebook app on your mobile device.
- Tap on the three horizontal lines in the bottom right corner of the screen.
- Tap on your name at the top of the menu.
- This will take you to your timeline.
How To See My Timeline on Facebook As Someone Else?
You can see how your timeline appears to others by using a simple feature in Facebook, and this is how you do it:
- Click on your profile picture on your home page.
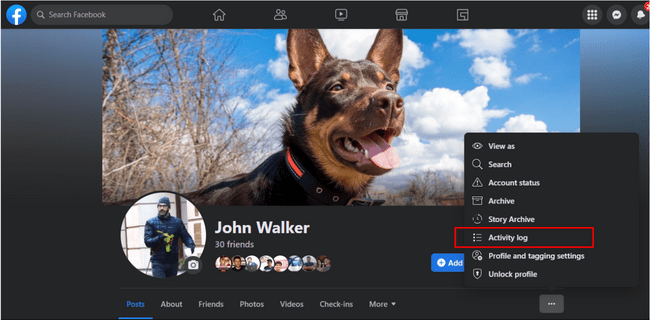
- In your profile, click the three dots button.
- Select “View as”.
- And your timeline will be visible to you from other profiles’ perspectives.
How to Find Friends on My Facebook Timeline?
Finding friends on your timeline is easy. To do so, follow these steps:
On the web:
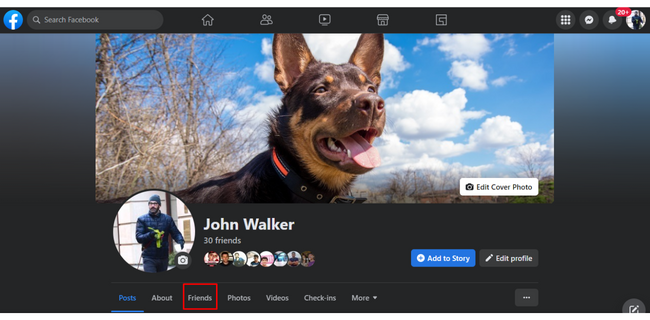
- Go to your timeline by clicking on your name in the top left corner of the screen.
- In your profile, click on the Friends tab.
- This will bring up a list of all of your friends on Facebook. You can use the search bar at the top of the page to search for specific friends by name.
On mobile:
- Tap on the three horizontal lines. Then, tap your name at the top of the menu to go to your Facebook Timeline.
- Scroll down and tap on the Friends tab.
- This will bring up a list of all of your friends on Facebook.
Stand Out on Facebook with AI Content 🌟
How to Add a Profile Picture and Cover Photo to Your Timeline?
Your profile picture and cover photo are important elements of your timeline, as they give your friends and family a sense of who you are and what you’re interested in. To add or change your profile picture and cover photo, follow these steps:
On the web:
- Go to your timeline by clicking on your name in the top left corner of the screen.
- Click on the profile picture/ cover photo, then select Update Profile Picture/ Edit
- Choose from existing photos or upload a new photo.
- Click on Save.
OR
- On your timeline, click on the Edit Profile/Edit Cover Photo button.
- Edit Profile Picture/Cover Photo: choose from your photos or add a new photo.
- Click on Save.
On mobile app:
- Tap on three horizontal lines. Then, tap on your name at the top of the menu to go to your timeline.
- Tap on your Profile Picture/Cover Photo/Edit Profile Button.
- Tap on the Select Profile Picture/Edit Profile/Edit Cover Photo.
- Once you have added or changed your Profile Picture and Cover Photo, click the ‘Save’ button to save your changes. This will update your timeline with your new profile picture and cover photo.
Apart from adding and updating your profile and cover photo, Facebook also lets you showcase your favorite songs on your profile.
To View Your Timeline Activity Log
On the web:
- Go to your timeline. Click on the three circles and click on the Activity Log button.
- This will include a list of your recent Facebook activity, including posts, comments, and likes. You can use the filters on the left side of the page to view specific types of activity.
On mobile app:
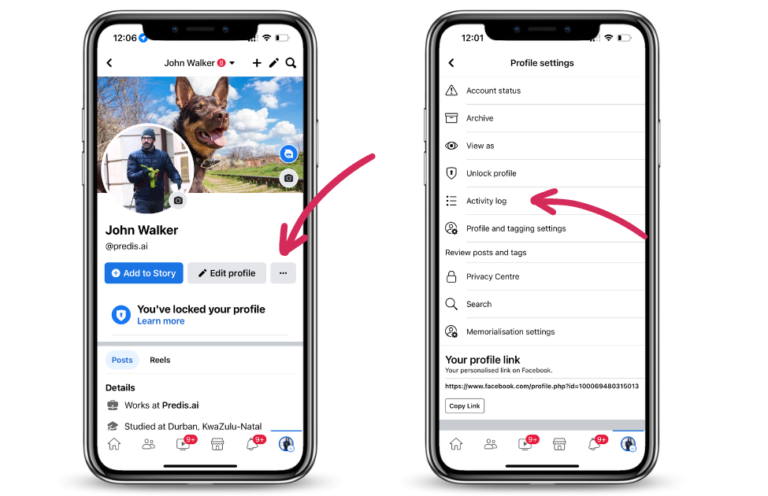
- Go to your timeline and tap on the three dots.
- Tap on the Activity Log option from the menu.
- This will show you a list of your latest activity on Facebook.
How to Hide Posts From Your Facebook Timeline?
Facebook has made it possible to hide a specific post from your timeline without changing your privacy settings. Wondering how? Here’s the answer.
1. Use the Manage Posts Option
The first way to hide your posts is to use the Manage posts option. This option allows you to hide/delete one or more posts from your timeline. You can also use it to add or remove tags from tagged posts and find a specific post based on the filters available.
- Open the Facebook app.
- Tap on your profile picture.
- Tap the Manage Posts option.
- Tap it again to select multiple posts.
- Now, you can use different filters by tapping the three lines at the top right corner of your screen. This will allow you to sort your posts and easily find the ones you want to hide.
- After selecting your posts, tap Next.
- Select what you want to do with the post. You can delete or hide the posts or remove tags from them.
2. Hide/Delete a Single Post
The next way is to hide or delete an individual post. Follow these steps:
- Open your app.
- Use filters to find the post you want to hide/delete.
- Once you’ve found it, tap on the three dots beside your name.
- Tap the Move to Trash option.
- And that’s it! Your post has been deleted.
If you do not want to remove the post, you can archive it. This way, only you will be able to see it.
How to Stop Anyone From Posting on Your Facebook Timeline?
Another way to have more control over your Facebook Timeline is to stop other people from posting anything on it. Here’s how you can do it:
1. On the Web
- Click on your profile picture.
- Go to Settings and Privacy.
- Click on Privacy, then Profile and Tagging.
- Under the profile settings, you will find the question, “Who can post on your profile?” Select Only Me.
2. On Mobile App
- Open the app and tap on your profile photo.
- Go to Settings and Privacy.
- Click on Profile Settings, then Profile and Tagging.
- Under the profile settings, you will find the question, “Who can post on your profile?” Select Only Me.
Facebook allows you to view who has shared your posts and manage who posts on your profile.
And that’s it! Only now can you post on your timeline.
Next, let’s equip you with a few tips for making your Facebook Timeline as engaging as possible.
Key Tips for an Engaging Timeline on Facebook
The steps we’ve covered will undoubtedly equip you to deliver better experiences for your connections and create more appealing profiles. However, it is still very important to keep the content on your Facebook Timeline as engaging as possible.
Here are some key tips we’ve curated to deliver the most engaging content possible:
- Post 20% promotional content while filling the 80% with non-promotional content that entertains and inspires your audience
- Maintain good content quality to ensure your audience stays engaged.
- Show the human side of your business, which is what your customers would want to see to better connect with you.
- Visuals are what hook the audience, so prioritize them.
- Adopt storytelling in your content strategy
- Use content types like questions and polls to improve interaction with customers
Common issues and how to troubleshoot them?
When you use the timeline, you might experience some of the following issues. Let us check out what to do when you do come across them.
- Loading issue: If your profile is not loading despite having a strong internet connection, then it might be a cache issue. Try reloading your profile after clearing the cache of your application in settings.
- Glitch: Sometimes, the applications can glitch because of various reasons. There are multiple ways in which you can resolve this. Some of the things that you can do include restarting the app, updating it, or logging in again. If none of this sorts out your problem, then check whether Meta is having their own downtime.
- Forgot username and password: You cannot be able to access your timeline because you forgot your username or password. In such cases, you can click on the “Forgot password?” option and reset it. This might require you to authenticate it with your registered email ID, though.

Wrapping Up
Now that you know how to see your timeline on Facebook and navigate it, you can use it to strengthen your connections, share experiences, and even relive the precious moments of your life.
All that’s left is representing your life’s events in the most lively, real, and active way possible. This is best done by crafting creative posts with your photos and videos, along with a crisp and compelling story. Need a helping hand? That’s where Predis.ai’s AI-powered comes in!
The Predis.ai Facebook Post Maker helps you create interactive posts and stunning content that will have your connections reach out in awe of your Facebook Timeline updates. Additionally, Predis.ai allows you total control over your content with its user-friendly editing tool and quick access to upload your creative assets. Predis.ai also offers thousands of ready-to-use templates that are guaranteed to boost engagement.
Use Predis.ai to seamlessly manage numerous social media channels, such as your Facebook account, and generate AI-powered interactive posts for your Facebook Timeline, all with a few clicks and a few lines of text.
Visit Predis.ai right now to see more guides of this kind!
FAQ:
The timeline is your Facebook page where you share your life events, and it appears in chronological order.
To see your Facebook timeline, click on your profile picture on your home page. And you will reach the page where your timeline is displayed.
You can hide, delete, archive, or pin posts on your timeline. You can use the ‘manage posts’ option to hide content.
Read Related:
Changing names on Facebook.
Largest groups on Facebook.
View old stories on Facebook.