
Explore this content with AI:
Some individuals have noted that the photo quality on Instagram isn’t as excellent as the original shot you took. Picture quality could improve dramatically, especially with the introduction of high-quality camera smartphones. When you upload photos or videos, they may appear blurry and lose their original high quality. There are a few methods for uploading high-quality photographs to Instagram without sacrificing quality. With over a billion users, Instagram is a successful photo-sharing software with just a few drawbacks. One of these issues is that many users’ Instagram profile picture seems to be blurry.
Blurry Instagram profile pictures can be hazy and difficult to view, whether due to the phone’s low-quality camera or the effect Instagram employs. In this blog, we will explore the top reasons for blurry Instagram profile picture and how to fix the same!
Top Reasons For Blurry Instagram Profile Picture
The following are the possible reasons for blurry posts and blurry photos on Instagram.
1. Excess Photo Size
Instagram automatically compresses photographs greater than 1MB, which often results in a loss of clarity and fuzzy profile photos.
2. Incorrect Aspect Ratio
Instagram crops all profile pictures that do not have a 1:1 aspect ratio. To keep your profile photo crisp, utilize the suggested ratio.
3. Incorrect File Formats
By default, Instagram supports JPEG or JPG files. Using any other format might result in a black or fuzzy image.
4. Using the Wrong Device to Upload
Instagram is a mobile app that works better on mobile devices than on PCs. Images uploaded from a PC may be grainy.
5. Slow Internet Connection
A poor internet connection is a common cause of blurry Instagram photos. To ensure consistent quality of uploads, ensure you are connected to fast-speed internet or Wi-Fi when you upload a new profile picture.
The easiest way to check if slow speed is the culprit behind your blurry profile picture is to do a quick speed check. If the results show a slow connection, reconnect using other means and check to see if the problem is resolved. You can also try turning airplane mode on and off. This can sometimes help with finding a more stable connection.
6. Using an Old Version of the Instagram App
Instagram routinely comes up with new updates and versions of its app. These updates resolve glitches in earlier versions and can also address performance and quality issues. If your Instagram app is out of date, it may affect the quality of the profile photo you upload. Check for an update on your app store, update if available, and try uploading again.
7. Using the Wrong Device
Instagram notes that the quality of your uploaded photos may be affected by the phone you use. To ensure sharp, non-blurry photos with a high resolution, use a phone with a high-quality camera.
How to fix Instagram’s blurry profile picture problem?
Your profile picture on Instagram is like your personal calling card. And unlike your Instagram posts, your Instagram profile picture is visible, even if your account is private. Additionally, people can see your profile picture when you leave comments, engage with other accounts, and launch ads for your business on the platform.
A If your Instagram profile picture is blurry, that can leave a negative impression about your account and dissuade people from checking out your feed. In the case of brands, color can impact brand recognition by 80%, and a large number of consumers purchase products based solely on visuals. Alternatively, a stand-out profile photo will lead to immediate engagement.
When people view a blurry photo, they wonder how to edit a blurry Instagram profile photo on Android, but they don’t have a solution since if they did, the problem would be fixed. So, in order to assist you with how to correct blurry photographs on Instagram, a few tips and tricks are mentioned ahead.
Instagram Data Configuration
You can repair blurry photographs on the Instagram app by tweaking the settings. To get rid of fuzzy and low-quality photographs, just disable the data storing option. Allow us to assist you;
- Open the Instagram app and tap the profile icon in the bottom-right corner.
- When your profile opens, tap on the three horizontal lines in the upper right corner. Open ‘Settings’.
- Tap on ‘Accounts’.
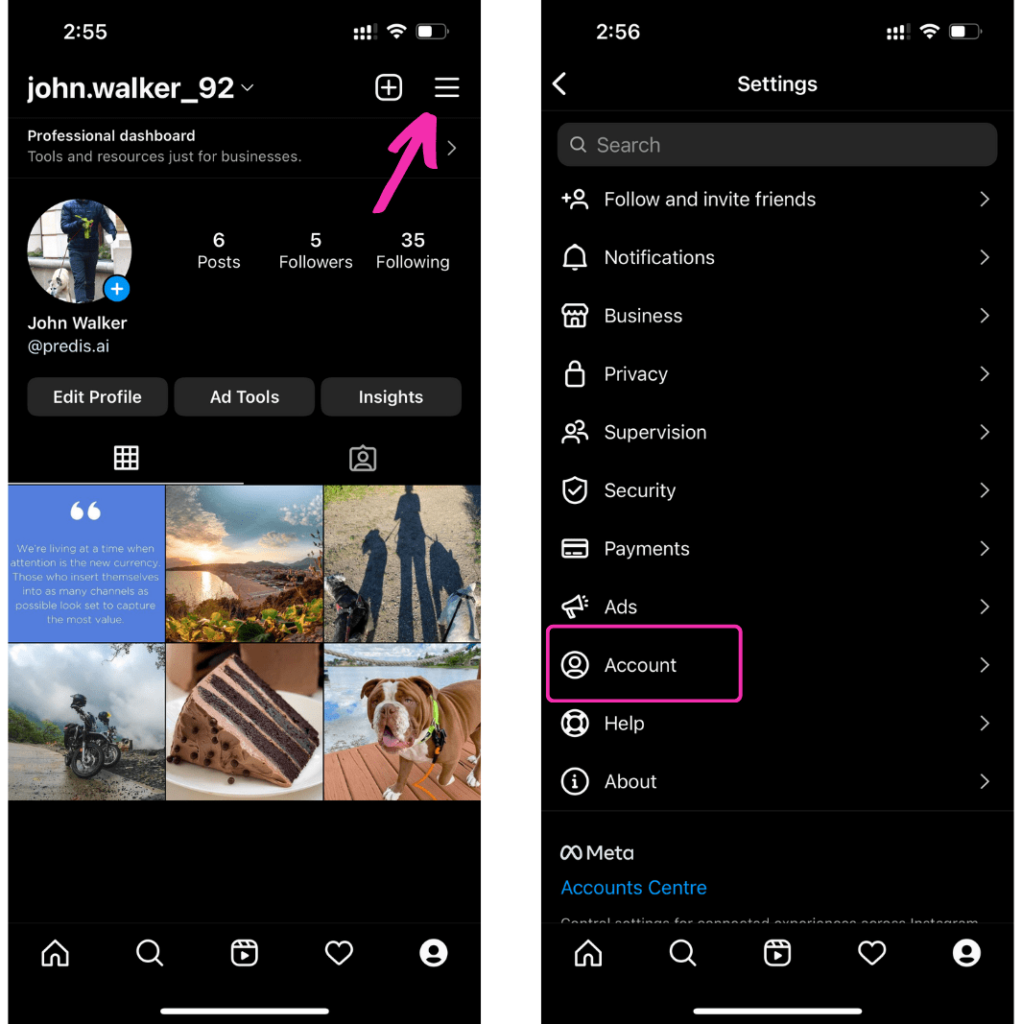
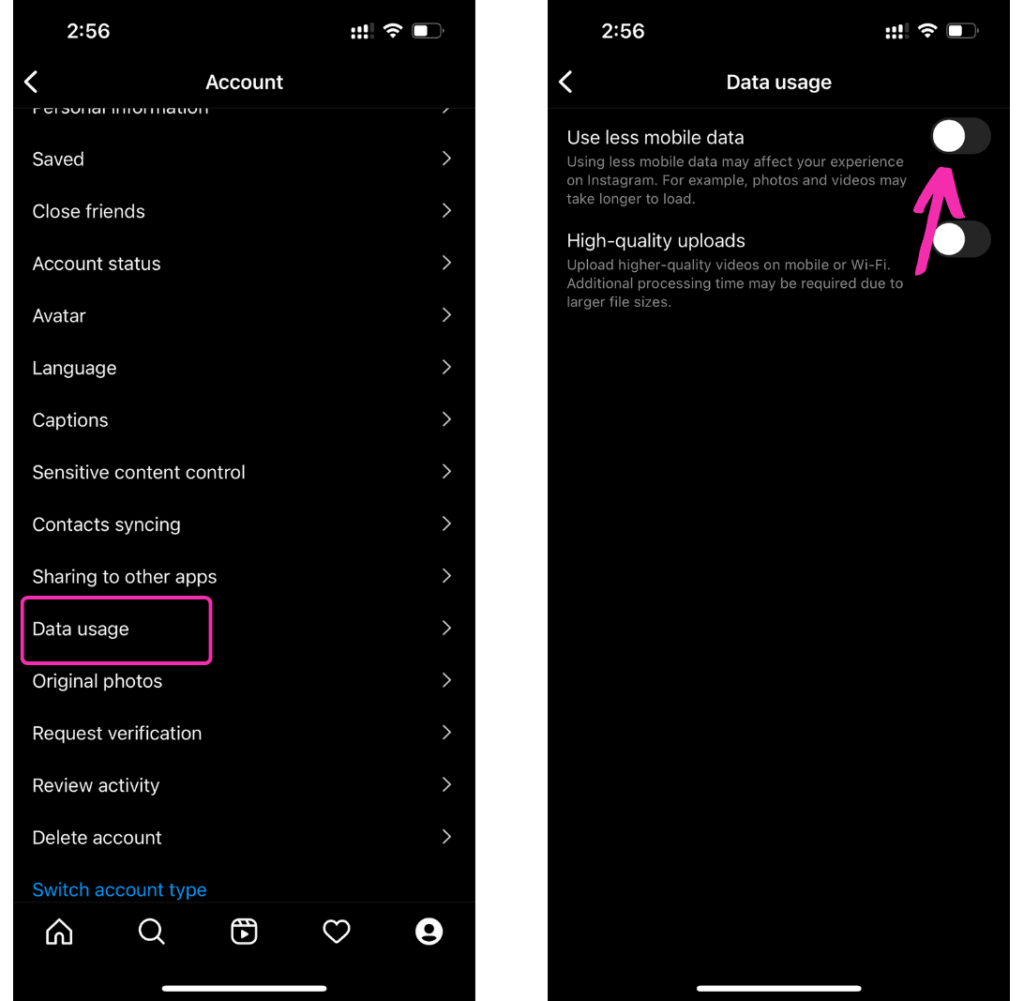
- Find and tap on ‘Data Usage.’
- Switch off the toggle button in front of ‘Use less mobile data.’
Optimize Your Phone’s Camera Settings to Reduce Quality Loss
The easiest approach is to optimize the camera quality on your phone to avoid a significant loss of quality in your Instagram image resolution. This means if you have higher-quality photographs when you post them to the Instagram app and they lose quality, the difference won’t be as noticeable as it would be if you hadn’t improved the quality in the first place.
- Launch the Camera app by default.
- Select the Gear symbol. This will open the Camera app’s settings menu. On the top area of the options, you’ll notice the photo size.
- Select Picture size.
- Set it to the highest resolution possible. You may also press on the video size to ensure it is at its highest definition. The example below uses FHD 1920 x 1080. If you’re going to use the front camera for selfies and movies, make sure you modify the settings accordingly.
Pre-Compress Photos/Use Instagram Camera
Instagram compresses all photos to meet its size requirements. The compression process can impact the quality of your photo. In order to avoid that, you have two options.
- You can compress the photos yourself. You’ll have better control over the quality of the resultant photo if you compress it before uploading. Try getting the photo size small enough to meet Instagram’s requirements while also retaining high quality by using a compression software of your choosing.
- Use the Instagram Camera to upload a profile picture. Taking a profile picture using an Instagram Camera means that it is already optimized for the app’s size requirements and will retain high quality. If you upload from the camera roll, the cropping and stretching Instagram does to compress the photo will affect the quality.
Use High-Quality Upload Setting on Instagram
Instagram compresses videos and photos uploaded by users for different reasons such as reducing high data consumption and increasing uploading speed. This affects the quality of the media you upload on Instagram. For instance, consider the quality of your profile photo. To ensure you upload only the highest quality profile picture, change these settings:
- Tap on the Profile Icon
- Open the Menu Panel
- Click on the Settings option
- Next, choose the account option
- Click on Mobile Data Use setting
- Toggle on the “Upload at highest quality” option
Using this setting will ensure Instagram uses more of your internet data to upload photos of high quality.
Use Instagram’s Camera to Avoid Quality Loss
If you’re already using another camera app, you might want to try Instagram’s built in camera app. Although there isn’t much you can do with Instagram’s default camera, it does shoot high-resolution photographs.
This method is the same as the previous way of obtaining a high-resolution photo, and the post will only be changed once it is uploaded to the platform. Your images will not be any less pixelated, but you will notice how they will switch on as soon as you take the shot, as opposed to when you upload them and see the significant loss in quality.
Stand Out on Instagram with AI Content 🌟
How to Post High-Quality Photos on Instagram?
There are several ways to prevent having your photographs reduced or blurred by Instagram. Here’s how to go about it:
Recognize Instagram’s Requirements
If you keep your photographs within Instagram’s restrictions, you can manage the quality and avoid having the application resize them for you.
The following are the uploading guidelines for photos on Instagram:
- Make use of the latest version of the Instagram app.
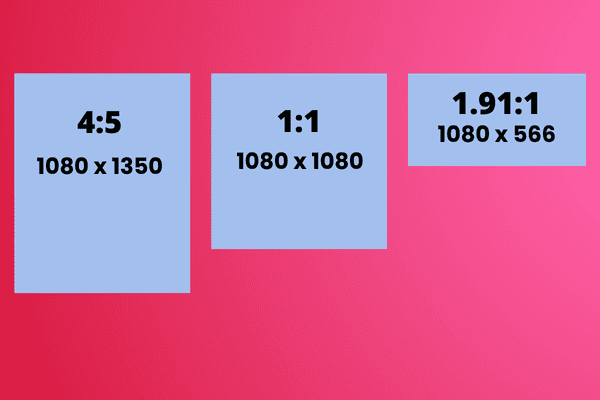
- Upload a photo with an aspect ratio between 4:5 and 1.91:1.
- Upload a picture with a maximum width of 1080 pixels and a minimum width of 320 pixels.
- Compressing a picture larger than 1080 pixels results in a loss of detail. Images with a width of less than 320 pixels will appear blurry due to magnification.
Adjust the Settings
Some iPhone users have complained that owing to a certain option, you may be unwittingly compressing your photo before uploading it to Instagram, especially if you use iCloud as your primary data backup method.
- To resolve this, open your iPhone’s settings and navigate to “Camera & Photos.” Then, if you have the choice, deselect “Optimize iPhone Storage.”
- Furthermore, if you use an online backup service such as Dropbox or Google Drive, be sure that the photographs are not compressed by these services as well.
Tips for Profile Pictures on Instagram
Your Instagram profile picture is the first image that visitors see that informs them who you are and what you do.
When it comes to social media, one of the first things people notice is your profile picture. And on Instagram, the profile picture is especially important because it is frequently the only thing people see. That is why it is critical to select a great profile picture for your Instagram account.
- Make use of a headshot or a brand logo
- Select a High-Resolution Image that is Clear
- Crop to the Ideal Size
- Incorporate a Vibrant Pop of Color
- Prefer Good Lighting
- To stand out, use contrast
- Consider Your Brand Identity
But what exactly makes a good profile picture?
Here are a few pointers:
Make Use of a Close-up
A close-up of your face should be your profile picture. This way, people will be able to see your face clearly and recognize you. Instagram’s display size for profile pictures is 110 x 110 pixels. A close-up improves recognition by making your face prominent and visible. Avoid panoramas and photos where you are too small to fill the frame, as they blur the impression and obscure details.
Avoid Over-Processing Your Profile Picture
Your Instagram profile must be sharp enough to make a clear impression. Overprocessing your profile picture by using filters or editing tools can potentially reduce its quality and make it look less sharp. If you want to modify your profile image, go light on the tweaking and save it for your main feed social media postings. Keeping it largely unedited ensures that your profile photo stays authentic, making a good first impression on visitors.
Include a Clear Photograph
Avoid using photos that are blurry or dark. A clear photo will help people see you more clearly and connect with you. Research shows that color psychology plays a role in how an audience perceives your brand or feed. If you run a brand’s Instagram account, colors are an especially important consideration.
For better returns on your social media content investment, a brand’s Instagram should research its audience for the best colors to use in its feed and profile. Make sure there is enough lighting in the picture to make your face well-lit and stand out against the background. To make yourself more visible, align your face and eyes with the source of light. If a photo is not clear, you can use tools to upscale image online to improve its quality. In this way you can avoid Instagram profile picture or any other photo to get blurry!
Use a Recent Photo
It’s critical to use a recent photo so that people know how you currently look. Steer clear of old pictures that might not accurately depict your appearance. When people meet you in person or communicate with you online, they should be able to identify you from your profile photo. Using a current photo helps you stay transparent and real, attributes that are essential for establishing a connection and trust with your audience.
Include a Friendly Photograph
Choose a photo of yourself that shows you as friendly and approachable. This will make people feel more at ease when interacting with you online. Selecting a snapshot in which you are staring directly into the camera might increase interaction and help you build a rapport with the audience.
Use a Consistent Image
It can be confusing for people to see you in different photos with different looks. Choose a photo that you can use on all of your social media accounts. It is easier for followers to recognize and interact with branded content when businesses maintain brand consistency by using the same profile photo on all social media sites.
Following these guidelines will assist you in selecting a great profile picture for your Instagram account. Remember that your profile picture is often the first thing people see, so make sure it accurately represents who you are.
Conclusion
You can resolve the problem of an Instagram profile picture getting blurry by paying attention to details such as photo size, file format, aspect ratio, and other minor details that most people miss. However, these factors can tell the difference between a clear and fuzzy photograph.
When choosing or creating your profile photo, always consider the aspect ratio and picture size. For the best quality and display, Instagram recommends a picture size of 320×320 pixels, with a 1:1 aspect ratio working best for profile pictures. To keep your profile photo sharp and clear across a range of devices and screen sizes, make sure it meets these requirements.
To maintain image quality when submitting your profile photo, use JPEG or JPG file types. These commonly supported formats provide effective compression without sacrificing much quality. Avoid uploading photos sent over messaging services like Facebook Messenger, as these images are typically compressed. You can ensure that your Instagram profile photo keeps its clarity and aesthetic appeal by selecting the appropriate file format.
In this regard, you can consider Predis.ai’s Instagram post generator to ensure your Instagram profile picture matches your personality.
FAQs
i) Adjust the Phone’s Camera Settings
ii) Launch your phone’s default Camera app.
iii) Tap the Gear (Settings) icon. It is normally located in the upper-left area of the screen.
iv) Set the image size to the maximum quality.
v) Apply the same logic to video quality.
Instagram retains your photo’s original size at a standard width of 1080 pixels as long as its height is between 566 and 1350 pixels. Your photo will be extended if it is less than 320 pixels wide.
If you have an Android device, we recommend Pixlr. To eliminate blur, choose a photo, navigate to the Tools menu, and then hit Sharpen. All you have to do now is drag the slider.
Fotor’s powerful picture enhancer may help you boost the quality of your photos with a single click. Simply upload your image and click the “1-Tap Enhance” button, and Fotor will identify and fix the lighting and color, increase details, and restore blurry in real time for your shot.
Related Content,
How to Fix ‘We Restrict Certain Activities to Protect Our Community’ on Instagram