Since its launch in 2020, YouTube Shorts has revolutionized short-form content, becoming a powerhouse platform for creators worldwide. Designed to rival TikTok, Shorts offers bite-sized, vertical videos that are quick to create and even quicker to consume. With over 50 billion daily views and more than 2.3 billion monthly visitors, it’s clear that YouTube Shorts has become the go-to for mobile-first audiences. For creators, this means an unmatched opportunity to reach millions with minimal production effort.
What makes Shorts so impactful? It’s not just about the format – it’s about the tools that YouTube offers to elevate content. Among these tools, the feature to add text to voice in YouTube Shorts directly from the YouTube app was missing. This functionality allows creators to convert text into voice overs, adding a new layer of storytelling without needing professional audio equipment or even recording their own voice.
The 2024 updates bring exciting enhancements to this feature, making it more accessible directly through the YouTube app. With multiple voice options and seamless integration, adding voiceovers to your Shorts is now easier than ever. For creators who prefer faceless videos or want to maintain a consistent tone and accent, this update is a game-changer.
Why is it crucial to master this feature? With the growing competition on YouTube, creating engaging, polished content is key to standing out. Text to voice not only saves time but also boosts your video’s accessibility and appeal to a global audience.
In this blog, we’ll explore everything you need to know about this feature. Ready to dive in? Let’s get started!
What Is Text to Voice Feature in YouTube Shorts?
Among the most advanced AI innovations, text to speech technology is particularly notable. Text to speech goes beyond displaying text; it transforms written words into spoken dialogue, achieving a level of naturalness once deemed unattainable.
The Text to Voice feature in YouTube Shorts is a game-changer for creators. This innovation allows you to convert written text into AI-generated voiceovers directly within the YouTube app. Earlier, creators relied on external AI tools like Predis.ai to achieve this, but with YouTube’s recent 2024 update, the process has become much easier and more integrated. Like this, adding AI narration voiceover to YouTube Shorts is simple and fully integrated within the app.
YouTube Shorts thrive on quick, engaging content. With text-to-voice, you can:
- Create faceless videos that still narrate your message effectively.
- Add professional narration without investing in recording equipment.
- Make your videos more inclusive and engaging for audiences who prefer voice overs to plain text.
While the feature is exciting, it’s still in its early stages. At the moment, YouTube offers only four voice options, which may feel limiting for creators who want more variety.
This feature bridges the gap between accessibility and creativity. It allows storytellers, educators, and marketers to focus on their message without worrying about voice over production. Whether you’re a casual creator or a professional, text to voice empowers you to produce high-quality content effortlessly.
Ready to explore how to use this feature? Let’s move to the next section and learn the step-by-step process!
How to Use Text to Speech Feature in YouTube App?
Creating voice overs for YouTube Shorts has never been easier. Thanks to YouTube’s in-app text-to-speech feature, you can now add voice overs directly, saving time and enhancing your content. Follow these simple steps to use this feature:
Step 1: Open the YouTube App
Launch the YouTube mobile app on your device and tap the “+” button at the bottom of the screen.

Step 2: Start Your Short
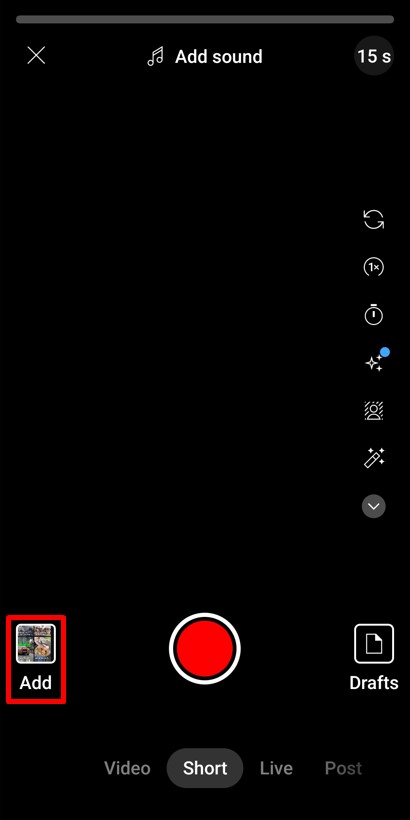
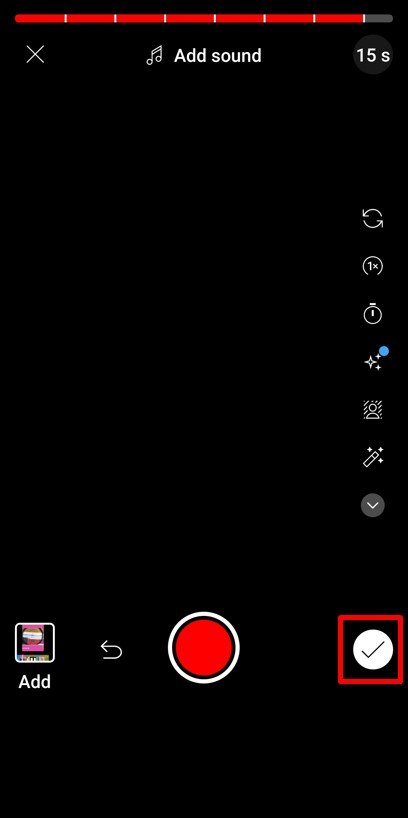
Select the “Create a Short” option. You can either record a video directly or click the “Add” button in the bottom left corner to upload pre-existing videos or images.
Step 3: Choose and Adjust Content
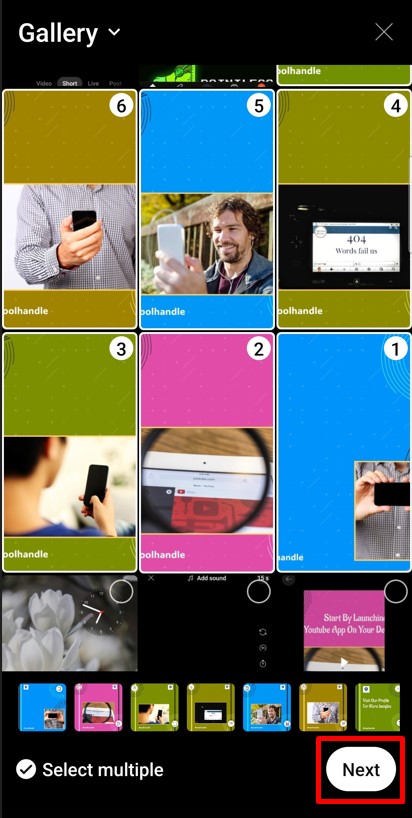
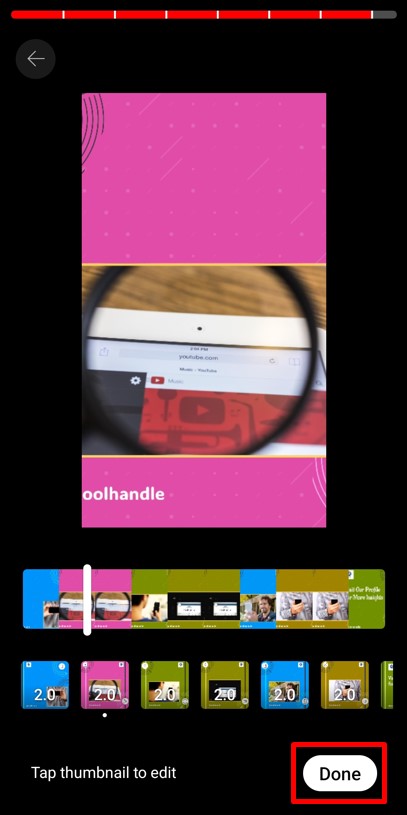
Pick the images and videos you want in your Short, then click on the Next button. Adjust their run times to ensure they fit seamlessly into your narrative. Click “Done” in the bottom right corner. Then tap the checkmark button to finalize your timeline.
Step 4: Add Text for Voiceover
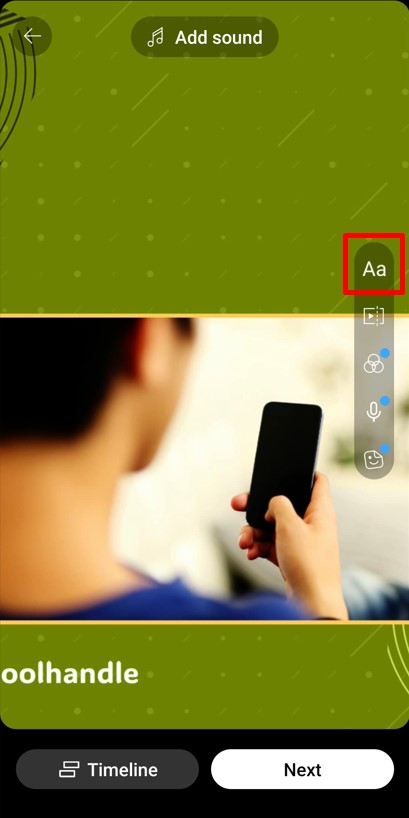
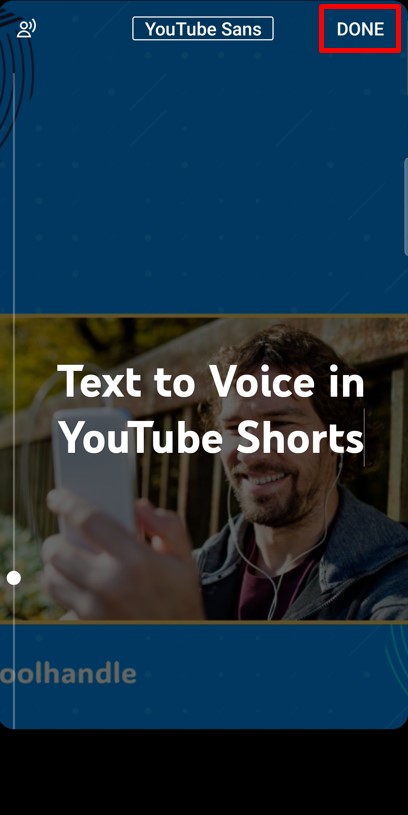
Tap on the “Add Text” option located in the right toolbar. Type the text you want to convert into speech and press “Done.”
Step 5: Select a Voice for the Text
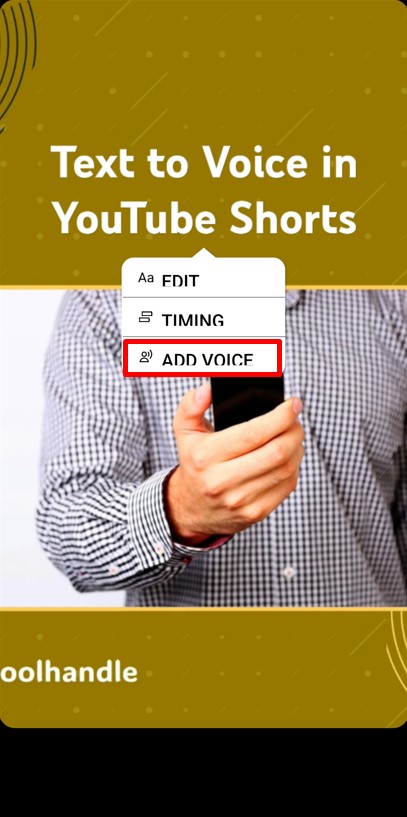
Click on the added text and choose the “Add Voice” option. From the available voice options (currently four), pick one that suits your content. Click “Done” to save your selection.
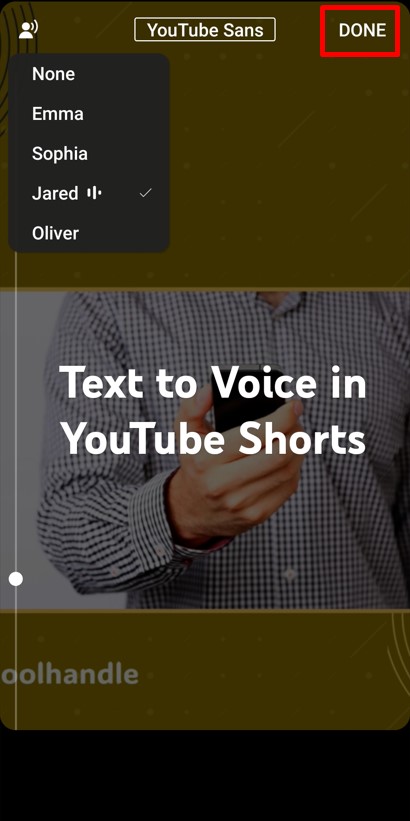
Step 6: Add Voiceovers to All Sections
Repeat the steps for all text sections that need voiceovers. Each voiceover will sync with its corresponding segment in the video. Once satisfied, tap “Next” in the bottom right corner.
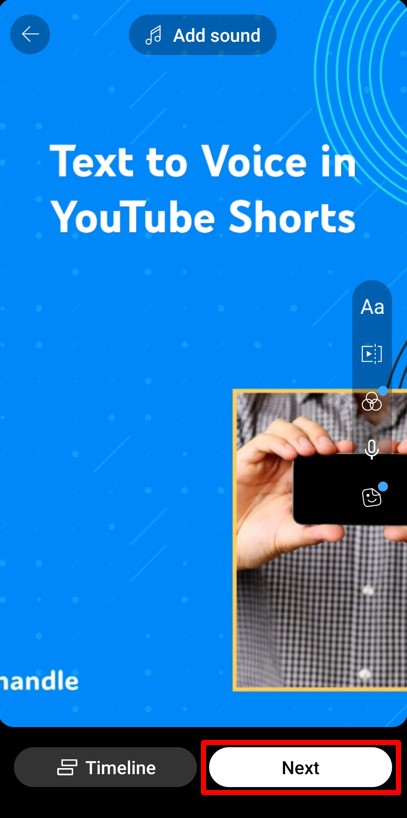
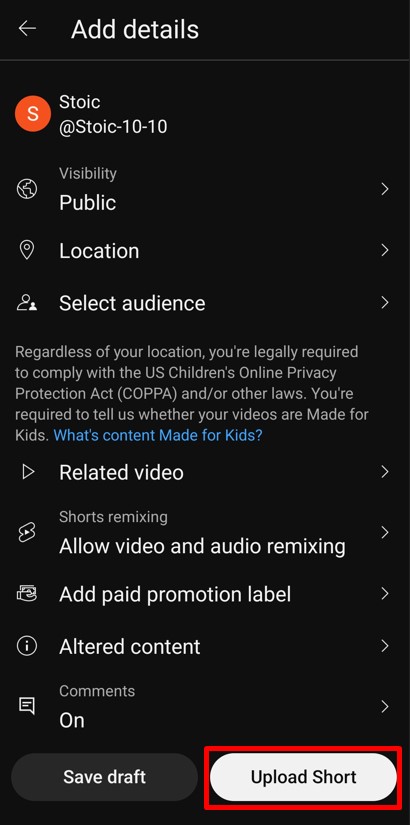
Step 7: Finalize and Upload
Add the finishing touches, such as a title, description, and hashtags. When everything is ready, hit the “Upload Short” button to publish your creation with the integrated text-to-speech feature.
With this new feature, adding professional AI voice overs is effortless. Get creative and monetize on text to speech Shorts feature!
Ready to explore how AI tools can add even more customization? Let’s dive into the next section.
How to Add Text to Voice in YouTube Shorts with AI Tools?
Follow these steps to learn how to use an effective text to voice in YouTube Shorts to make your videos more entertaining, educational, and interesting for your audiences!
Step 1: Choose the best AI Text To Speech Tool
The journey begins with selecting an AI-powered text to speech tool. It could get difficult to select the best tool out of the several options available. Consider the following factors before you select the best AI text to speech tool for YouTube Shorts:
- Voice Quality – Look for software that ensures high quality that is pleasant and clear to listen to, with natural-sounding tones and accents.
- Language Support – Check whether the selected TTS software supports a wide range of languages, specifically the ones you intend to use in your YouTube Shorts.
- Customization Options – The software should be well-equipped with options that can help you customize voice speed, pitch, tonality, and emphasis.
- Seamless Integration – You must ensure that it is easy to integrate the software into your existing system, file format, and devices so that it gets easier for you to export audio files. The software must have a compatible and user-friendly navigation system and interface.
- Cost Model – Check for trial periods, compare subscription fees or pricing plans, look for hidden or additional fees, and select the most affordable option for your needs.
- Licensing Rights – Make sure you have the necessary permissions and that you are not misusing copyrights before you use the generated voiceovers in your YouTube Shorts.
- Reviews and Consumer Support – Always check user reviews to assess the software’s reliability and performance and simultaneously evaluate the level of customer support offered by the TTS software provider.
Make scroll-stopping Voiceover Videos for TikTok, Instagram Reels, Facebook, and YouTube through simple text input. Use our AI Voiceover Video Maker to generate video with voiceover, background music, and stock assets for your social media videos.
Step 2: Input Your Text
This step is crucial as the quality of your input determines the output’s clarity and effectiveness. Follow these best practices to ensure that the quality of your content is high:
- Fill in the Text – Enter your content into the text input area of the tool. This could be a script for your YouTube Short, a narrative, or any text you want to convey audibly.
- Format the Text – Make sure the text is free from formatting errors. Unnecessary line breaks, extra spaces, or special characters can disrupt the natural flow of speech.
- Edit the Content – Pay special attention to the pronunciation of names, technical terms, or any unique words. Many advanced TTS tools offer pronunciation customization, which can be crucial for accuracy.
- Review – Thoroughly review your text before confirming it, as this will form the basis of the generated speech.
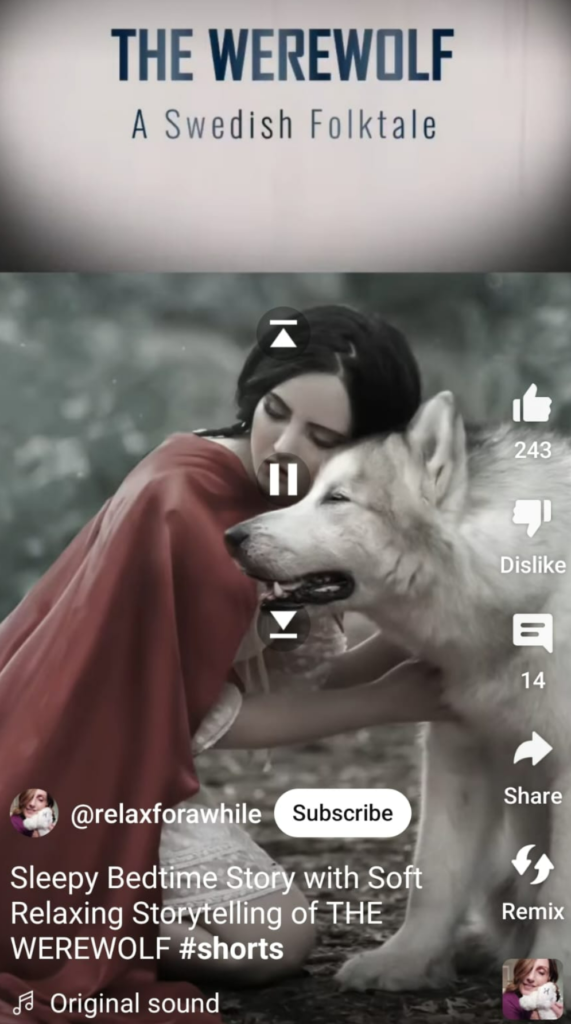
Below is an example of a popular channel that uses Voiceover functionalities for story-telling using text comprehensively:
Step 3: Select Preferred Voice and Settings
Customizing the voice and settings is a critical step to ensure your audio matches the intended tone and style of your content. Here are some tips that will help you select and apply the most suitable voice settings for your YouTube Shorts:
- Explore the tool’s library of voices and accents. You might want a voice that sounds professional for educational content or something more casual for entertainment.
- Consider language and accent options, especially if your audience is global or specific to a region.
- Some tools offer advanced customization like gender selection, emotional tone, and other voice characteristics. Experiment with these to give your content a unique touch.
Check out the example given below, which is a YouTube Short example of a DIY channel using a voiceover that is apt as per context.
Step 4: Generate the Speech
After setting up your text and preferences, initiate the speech generation. Listen to the output to ensure it sounds natural and effectively communicates your message.
Here are some critical points to consider before you finalize the speech:
- Be aware that longer texts may require more processing time.
- Listen to the generated speech carefully. It’s important to ensure that the voice sounds natural and conveys your message effectively.
- If you find any issues, such as mispronunciations or awkward pauses, go back and adjust the text or settings accordingly.
Step 5: Adjust the Settings
Fine-tuning speech settings, such as rate, pitch, and volume, is essential. These adjustments should enhance your content’s clarity and engagement. Ensure consistency throughout your audio for a professional and immersive experience.
Here are some suggestions that will help you to adjust the settings professionally:
- Tweak the speech rate to find the right pace. A speech that’s too fast might be hard to follow, while too slow can be boring.
- Play with the pitch to add expressiveness or match the mood of your content.
- Adjust the volume to ensure it’s audible and balanced with any background music or sound effects in your YouTube Short.
- Ensure that these settings are uniform throughout your audio to maintain a professional and engaging experience.
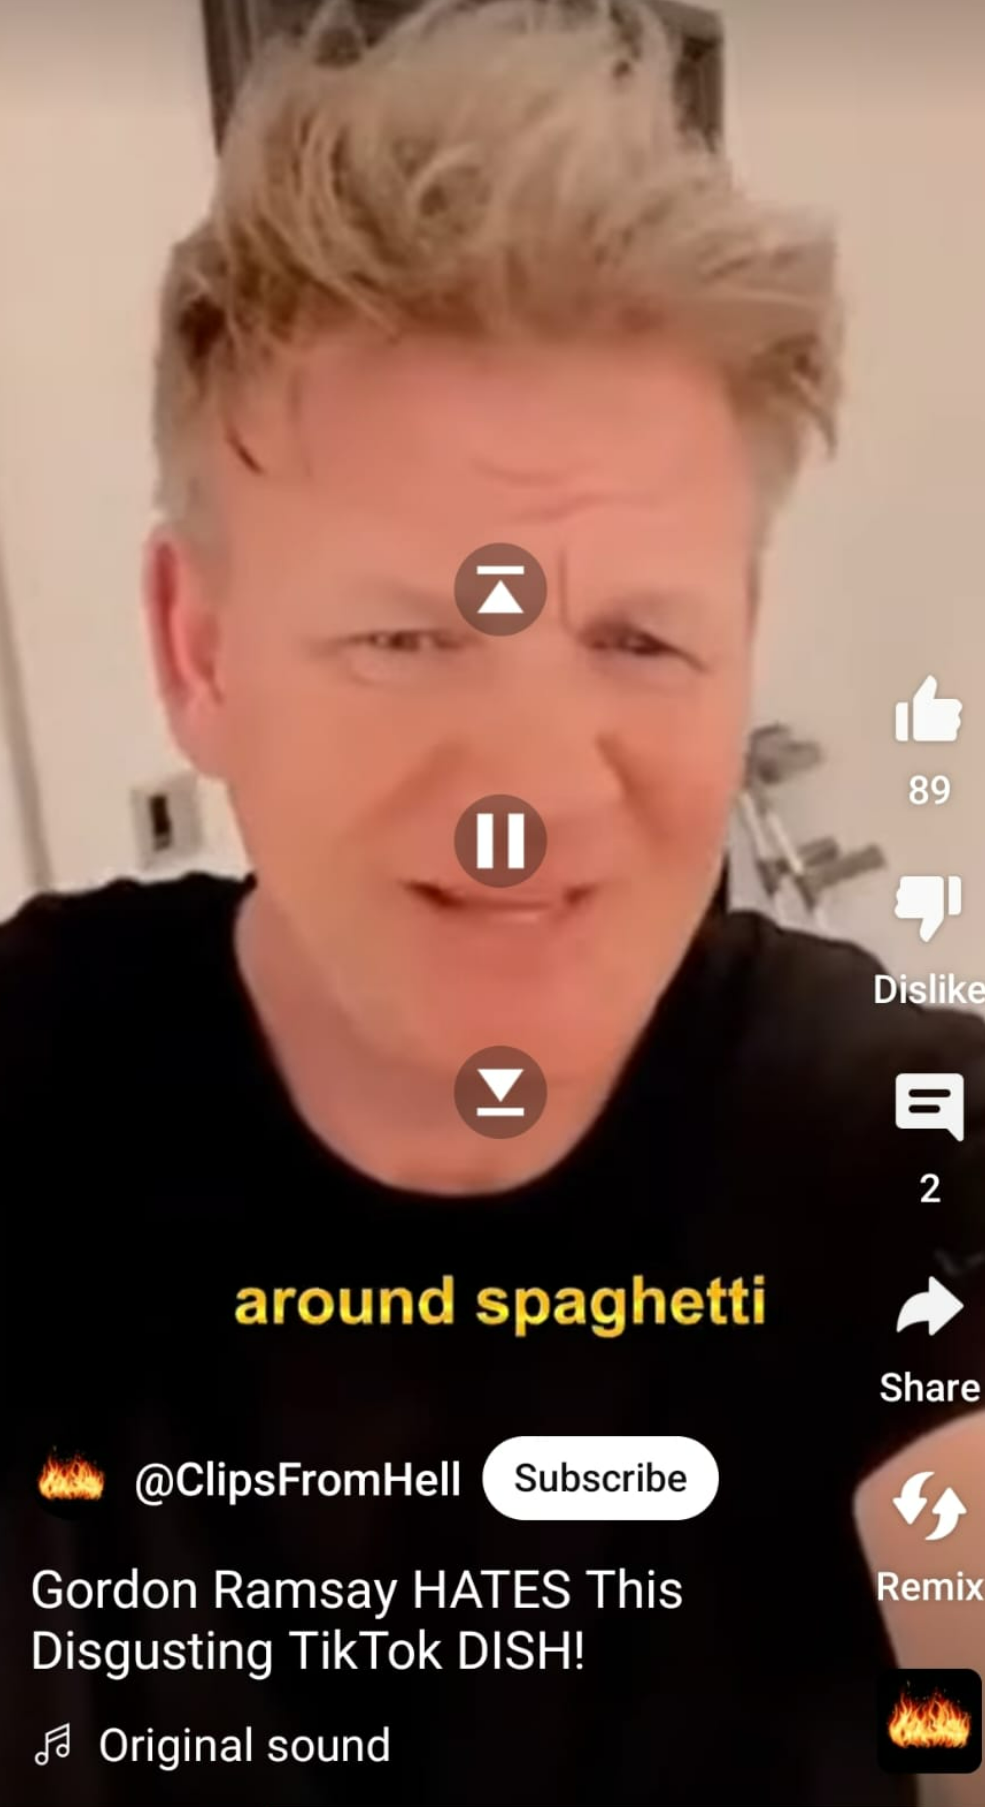
Check out the example given below. This is an example of how voiceover functionality from text to speech software and tools can be used to effectively explain videos:
Step 6: Preview Your Audio
Previewing your audio is essential to catch any issues before finalizing. You must:
- Use the preview function to listen to the entire speech.
- Pay attention to the nuances, such as how natural the speech sounds, if the pacing is right, and if the pitch suits the content.
- Check the timing and flow of your video. The audio should complement the visual elements, not overpower them.
- If possible, get feedback from others. Fresh ears can often catch things you might have missed.
Step 7: Save, Share, and Integrate Your Audio into YouTube Shorts
The final step is to integrate your audio into your YouTube Short. Before you share your video, consider the following:
- If the text to speech tool offers direct sharing to YouTube, take advantage of this feature for efficiency.
- Sync the audio with your video, ensuring the speech aligns with the visuals.
- Test your YouTube Short thoroughly. Look for synchronization issues or volume inconsistencies and adjust as needed.
- Finally, save your YouTube Short with the integrated TTS audio and share it with your audience.
Want to make your content creation and posting more streamlined? Use Predis.ai’s content scheduler to seamlessly generate, post, and schedule content across all your social media platforms.
Stand Out on YouTube Shorts with AI Content 🌟
How to Create Text-to-Voice YouTube Shorts Using Predis.ai?
Creating YouTube Shorts with text-to-voice is a breeze with Predis.ai. This AI-powered tool simplifies the process, letting you design, edit, and publish engaging Shorts effortlessly. Follow these steps to get started:
A. Step 1: Start a New Project
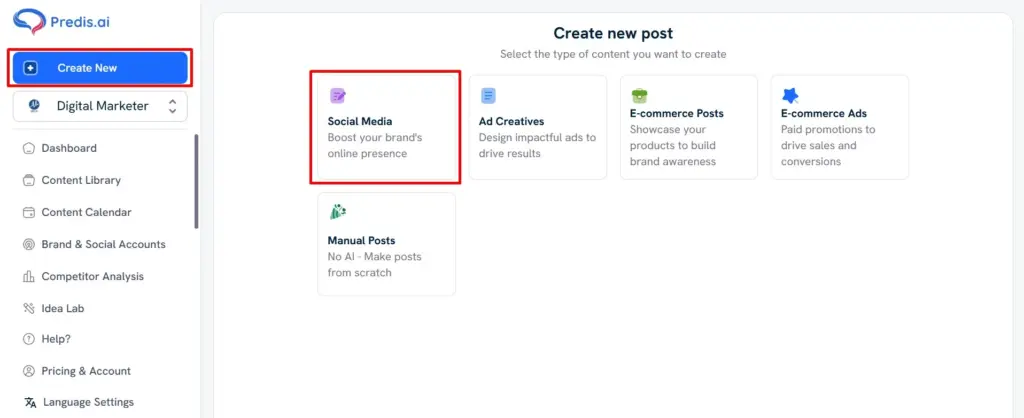
- Open Predis.ai and click on the Create New button.
- From the options, select Social Media to begin creating your YouTube Short.
B. Step 2: Choose Video with Voiceover Option
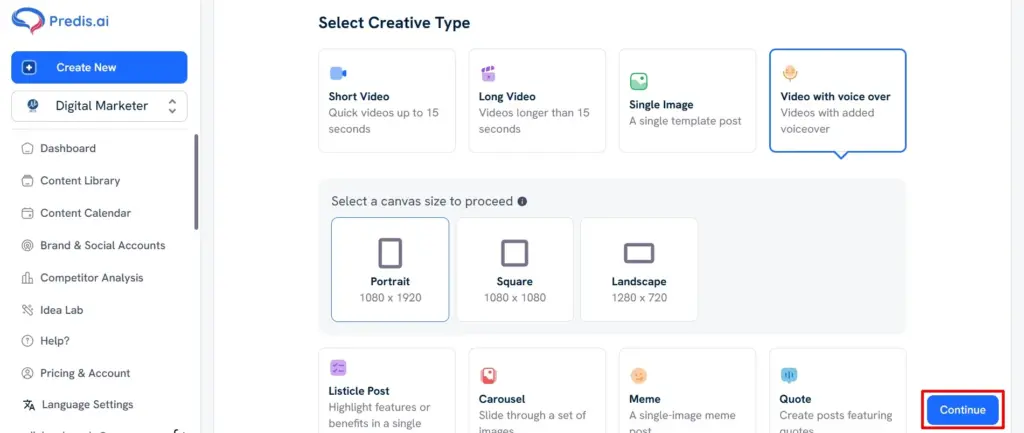
- Select Video with Voiceover under Creative Type.
- Choose the Portrait size (9:16) for Shorts and click the Continue button in the bottom-right corner.
C. Step 3: Provide Details for Generating Video
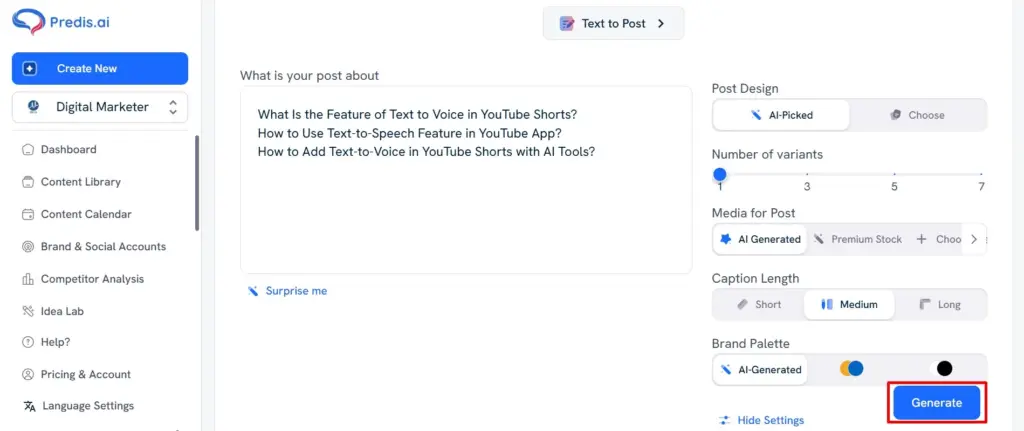
- Enter details about your video, such as its topic or script, in the text box.
- Adjust settings like post design, Input-output language, and caption length as per your preference.
- Click the Generate button to create your video.
D. Step 4: Access and Edit Your Video
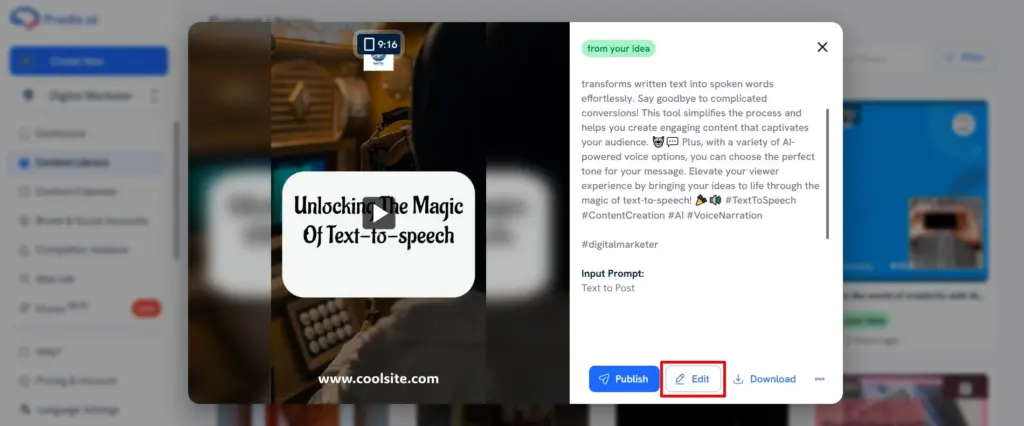
- Once the video is generated, find it in the Content Library.
- Click on the video and select the Edit option to make customizations.
E. Step 5: Customize Media and Text
- Modify the media, templates, and text to suit your preferences.
- Any changes to the text will automatically update the voiceover, keeping everything synchronized.
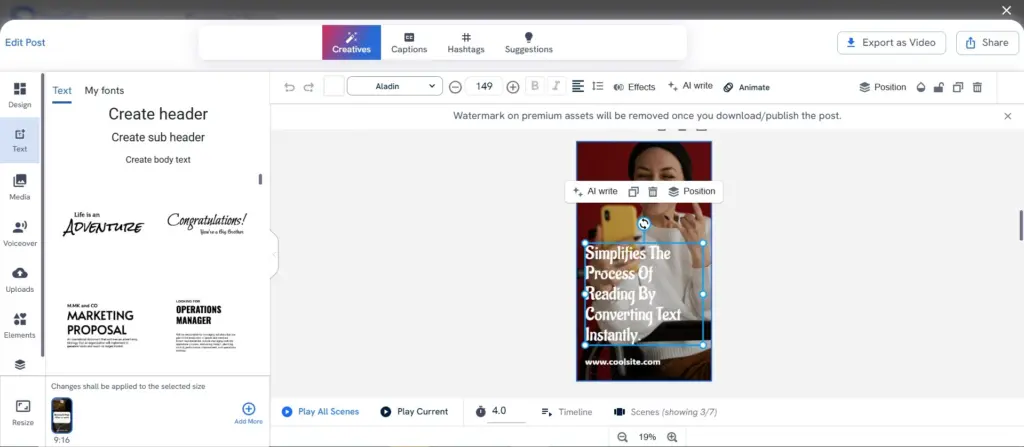
F. Step 6: Change the Voiceover
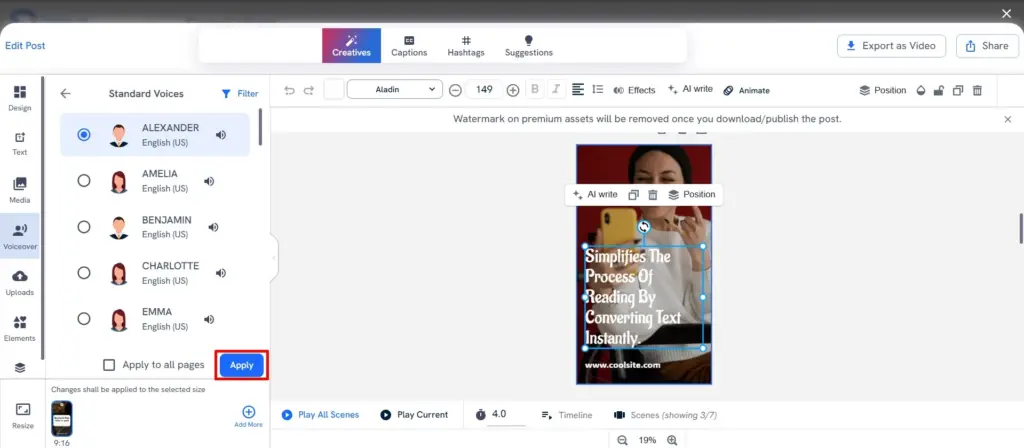
- Navigate to the Voiceover tab on the left-hand menu.
- Click on Change to select a different voice for your video.
- After choosing the desired voice, press the Apply button to save the changes.
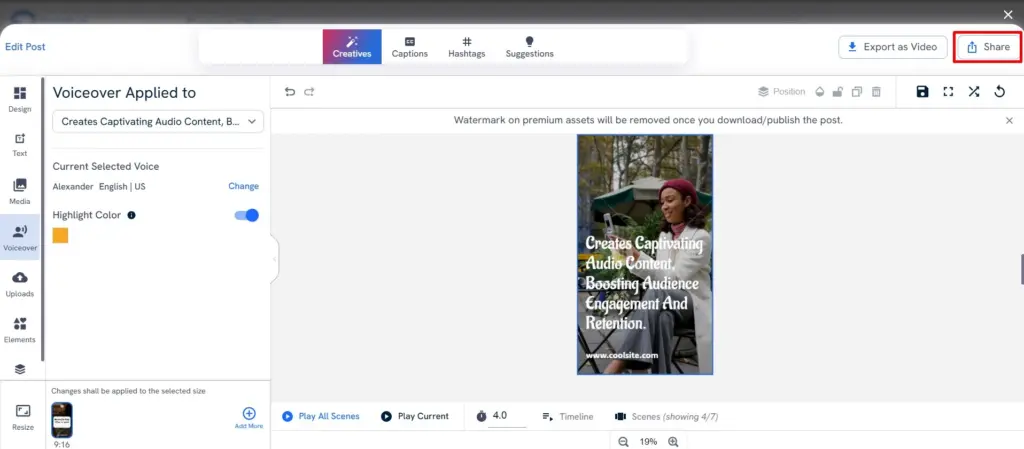
G. Step 7: Save and Share
- Once you’re happy with your edits, click the Save button.
- Use the Share button to post or schedule your YouTube Short directly through Predis.ai.
Predis.ai combines efficiency with creativity, making it easy to craft high-quality text-to-voice videos. With customizable templates, seamless voiceover options, and a user-friendly interface, it’s perfect for streamlining your Shorts creation process.
Revolutionize your YouTube Shorts with Predis.ai's YouTube Shorts Maker - make and edit short videos easily using AI. Say goodbye to hours of scriptwriting, searching for visuals, and editing videos.
Next up, let’s dive into the benefits of using text-to-voice in YouTube Shorts!
Benefits of Using Text to Voice in YouTube Shorts
Text-to-voice technology is transforming how creators make content, especially for YouTube Shorts. Here are some key benefits of using this feature:
- Time-Saving for Creators
Creating voiceovers from scratch can take hours, especially if you’re not a pro. Text-to-voice tools simplify this by turning written text into audio instantly. It’s perfect for creators juggling tight schedules. - Professional and Consistent Voiceovers
With text-to-voice, you get high-quality, consistent audio that sounds professional. No more worrying about different tones or background noise. It ensures every video maintains the same high standard. - Faceless Content Creation
Not comfortable being in front of the camera? Text-to-voice lets you create engaging content without showing your face. It’s ideal for tutorials, explainer videos, or storytelling. - Accessibility for Global Audiences
Text-to-voice tools support multiple languages and accents. This opens up your content to a wider audience, making it easier to connect with viewers from diverse backgrounds. - Cost-Effective Solution
Hiring a professional voiceover artist can be expensive. Text-to-voice tools provide an affordable alternative without compromising quality. - Boosts Engagement
Adding a voiceover makes videos more dynamic and engaging. It captures viewers’ attention and keeps them hooked, increasing watch time and overall engagement. - Flexible Customization
These tools let you tweak speed, pitch, and tone to match your brand’s personality. It’s easy to experiment and find the perfect voice for your Shorts.
Using text-to-voice in YouTube Shorts can revolutionize your content strategy, helping you create impactful videos effortlessly and monetize voiceover videos on YouTube.
Conclusion
In the ever-evolving world of video content, especially with the rise of YouTube Shorts, the integration of text-to-voice technology is a true game-changer. Before this innovation, creating high-quality, engaging short videos required significant effort, from scripting to voiceovers. But now, AI-powered text-to-speech tools have simplified the process, empowering creators to focus on what matters most – creativity and storytelling.
The text-to-voice feature for YouTube Shorts has brought a new level of efficiency and accessibility to content creation. Creators can now produce faceless yet compelling videos with consistent tone and clarity. This is particularly beneficial for those looking to streamline their production while maintaining professional quality. Whether you’re a solo creator, a brand, or an educator, this technology opens up endless possibilities for connecting with audiences in a fast-paced digital landscape.
With YouTube’s 2024 update enabling AI-generated voiceovers directly from the app, the process has become even more convenient. Combined with AI tools like Predis.ai, creators now have access to unparalleled customization and editing capabilities. It’s the perfect blend of innovation and ease, designed to help you stand out in a sea of content.
Ready to take your Shorts to the next level? Embrace text-to-voice technology and let your ideas resonate like never before.
Transform text into engaging videos with Predis.ai's AI Text to Video Maker - create stunning content for Instagram, TikTok, Facebook, and YouTube in seconds! Convert simple text into captivating videos with voiceovers, music, and stock footage using Predis.ai.
Predis.ai is an AI-based tool designed to assist users, particularly businesses and content creators, in generating social media content. Its Voiceover Video functionality uses Artificial Intelligence to simplify and optimize the content creation process for creating effective YouTube Shorts.
Predis offers features like voice edits, multi-lingual and multi-accent support, clarity in speech, automated content suggestions, image editing, and performance analytics. Try Predis.ai for FREE.
Stay tuned for answers to your most pressing questions in the FAQs section!
FAQs
Yes, you can! With YouTube’s latest 2024 update, the app now allows creators to add text-to-speech voiceovers directly. You can convert written text into an AI-generated voice while creating or editing your Shorts. This feature simplifies the process and ensures your videos sound professional without needing manual voice recordings.
Getting an AI voice on YouTube Shorts is easy. Use the text-to-speech feature within the YouTube app by adding text to your video and selecting the “Add Voice” option. Choose from the available voice options, and the app will automatically generate a voiceover for the selected text. If you need more customization, tools like Predis.ai can help you create advanced AI voiceovers.
Absolutely! Text-to-speech isn’t limited to Shorts. You can use it for any type of YouTube video, including long-form content, tutorials, and ads. While the YouTube app provides basic functionality, external tools like Predis.ai offer more advanced features, such as customizable voices and professional-grade audio quality.
Adding a voiceover to YouTube Shorts is straightforward. Record your video, then use the YouTube app’s editing tools to add text. Select the text, choose the “Add Voice” option, and pick your preferred voice. For manual voiceovers, you can record audio separately and sync it during the editing process.
