

Want to boost engagement and make your posts easier to find? A simple way to do that is to add location to Instagram posts and stories. Instagram posts with a location tag get 79% more engagement than those without. Whether you’re a traveler sharing your latest adventure, a business owner looking to attract local customers, or just posting a casual outing, tagging your location helps people discover your content.
Using location tags also improves your Instagram strategy. They enhance visibility, attract more followers, and make your content more relevant. Plus, if you have a business, adding a location can drive foot traffic and customer interactions.
In this guide, we’ll walk you through everything – how to add location to Instagram posts and stories, and even create a custom location when one doesn’t exist. Let’s dive in!
Why Use Locations on Instagram?
Just like in the real world, knowing the location influences our decisions. From picking a restaurant to finding a vacation destination, understanding the “where” is key. This is why adding locations to your Instagram posts can be a game-changer, especially when paired with engaging content.
Most of the content creators will affirm how beneficial it is for your growth. Here are some of the benefits:
- Boosts Engagement: Adding a location tag grabs attention and sparks interest in your content.
- Increases Discoverability: Location tags help people find your content through search, making it easier for potential customers to discover your brand.
- Builds Trust: Letting people know where you’re located fosters a sense of legitimacy and transparency.
- Improves Local SEO: For local businesses, location tags are essential for ranking higher in local search results.
- Airbnb Success: If you manage an Airbnb, location is crucial for attracting guests searching for specific areas. Whether it’s a charming city escape or a remote cabin retreat, tagging your location helps the right audience find your listing.
- SEO Benefits: Adding locations to your photo descriptions, particularly those related to your branded services, can improve search engine trust and ranking.
- Making it Easy for People to Find You: Your location will be prominently displayed at the top of each post, right below your username or brand name. Ensuring your location is accurate is vital for discoverability. Your Instagram insights will show the positive impact of proper location tagging.
How to Add Location on Instagram Posts?
Tagging a location in your Instagram post is a great way to increase engagement and make your content more discoverable. Whether you’re sharing a travel photo, a food post, or promoting your business, adding a location helps your audience know where the action is happening.
Here’s a simple step-by-step guide to adding a location to Instagram posts:
1. Create a New Post
- Open the Instagram app and tap the + (plus) icon at the bottom of the screen.
- Choose Post and select the photo or video you want to upload.
- Tap Next to move to the editing and caption screen.
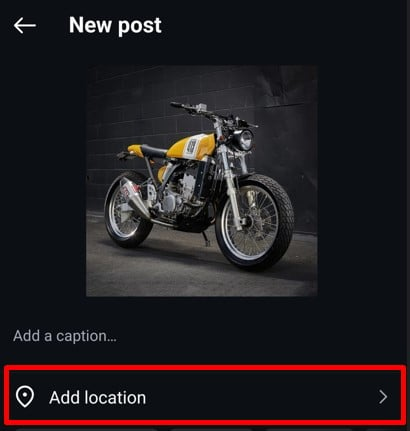
2. Tap ‘Add Location’
- Below the caption box, you’ll see an ‘Add Location’ option.
- Tap on it to search for your desired location.
3. Search for a Location
- Type the name of the location in the search bar.
- Instagram will suggest places based on your location or previous searches.
- Select the correct location from the list.

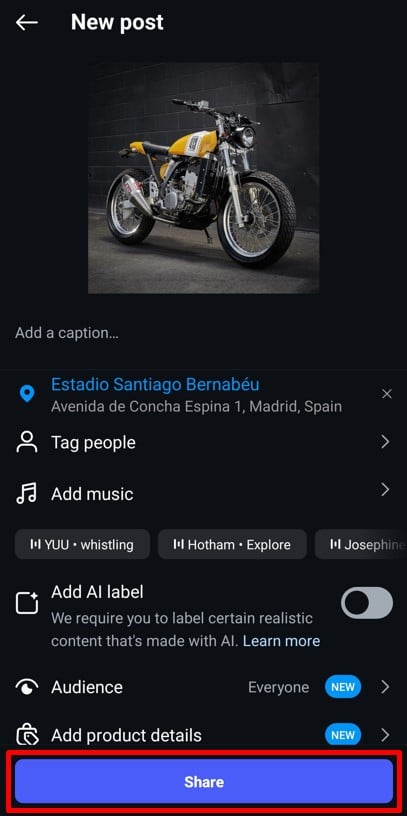
4. Post Your Content
- Once your location is set, finalize your caption, hashtags, and tags.
- Tap Share to publish your post with the location tag.
If you forgot to add a location while posting, don’t worry! You can edit the location of your posts later and add the location at any time. Start tagging your favorite spots today!
Create scroll stopping Reels and with Predis's AI Reel Generator.
Use our state of the art AI tool to generate ready-to-post stunning videos for your social media.
How to Add Location on Instagram Stories?
Instagram Stories are one of the most engaging features, with 500 million people using Instagram Stories daily. Adding a location to your Stories not only helps increase engagement but also makes your content discoverable to a broader audience. Whether you’re tagging a trendy café, a travel destination, or your business location, using the location sticker can boost visibility.
Follow these simple steps to add a location to Instagram Stories:
1. Create a New Story
- Open the Instagram app and swipe left or tap on your profile picture at the top-left corner.
- Capture a new photo/video or upload one from your gallery.
2. Access the Sticker Menu
- Tap on the sticker icon (a smiley face) at the top of your screen.
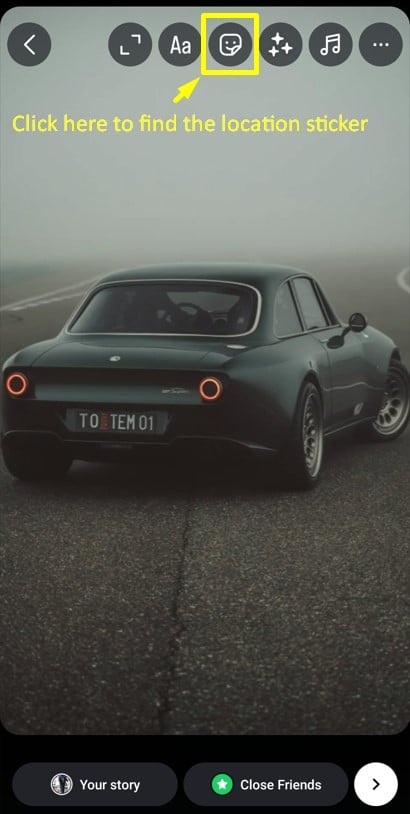
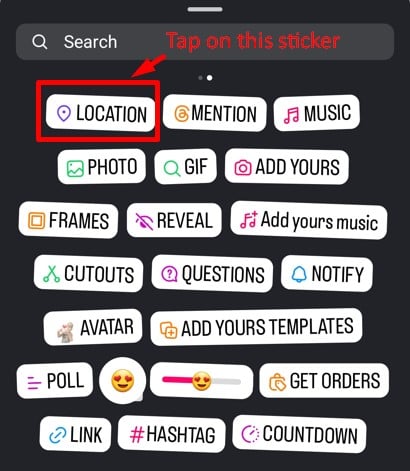
- Select the “Location” sticker from the list.
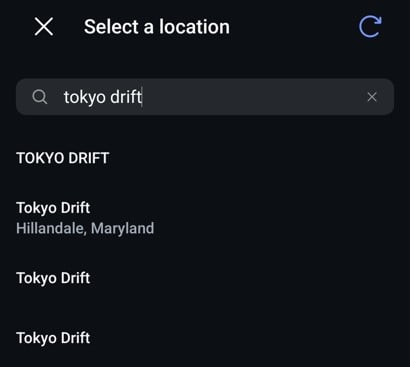
3. Search for Your Location
- Type the name of the place in the search bar.
- Instagram will display location suggestions based on your input.
- Tap on the correct location to add it to your Story.
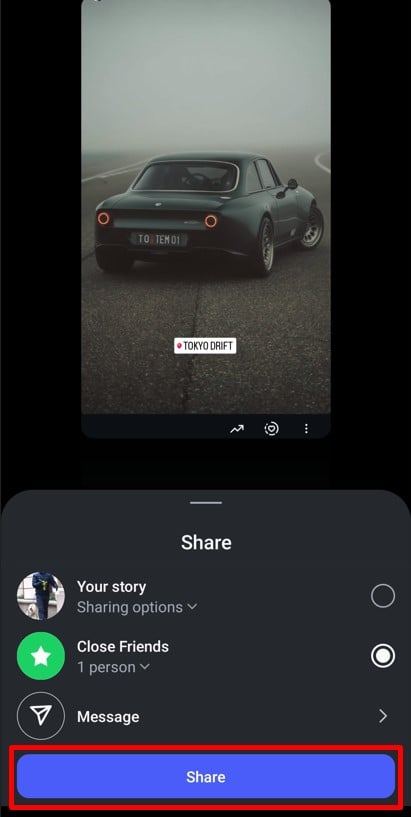
4. Adjust and Post
- Drag the location sticker to position it anywhere on your Story.
- Resize it by pinching it in or out.
- Add any other stickers, text, or effects to personalize your Story.
- Tap Share to publish it in your Story or send it to close friends.
Create Stories that stand out with location tags! Whether you’re a traveler, influencer, or business owner, using the Instagram location sticker can make a big difference in your engagement and visibility. Try it today!

Location option not working? Here are 5 Quick Fixes
If your location option is not working, then try employing these fixes to solve the issue.
- Do some basic fixes: These are some basic fixes that you can try, such as updating or restarting your app and switching off the airplane mode. Sometimes these small fixes might be sufficient to get it sorted. Also, make sure you have a strong network connection.
- Enable location: If your location is not getting detected on Instagram, see if your location service is turned on via your settings.
- Give location access to Instagram: This is another case where the location could be turned on your phone, but the access is not given to the Instagram app. So, double-check if Instagram has access to your location.
- Try posting, then editing: You might not be able to add location at a time, but this issue might not persist when you try to edit the post. So, you can edit the post and add your location after some time.
- Clear cache: Too much cache of an app can cause the application to have performance issues. So, head to your settings and clear it out.
How to Add Your Custom Location on Instagram?
Location tags on Instagram are powerful tools, but they can be more than just pinpointing your physical address. Here’s what you need to know:
- Customizing Your Location Tag: Instagram allows users to create custom locations. This means you can tag your business location, or even your website (though it won’t create a clickable link). This is a creative way to get users to see your website address and potentially explore your content further.
- Sparking Interest with Playful Tags: Location tags can also be a bit of fun. You can create tags for fictional places like “Home Sweet Home” or “Paradise.” While users know these locations aren’t real, these lighthearted location tag ideas can still spark curiosity and draw attention to your posts.
Here is a step-by-step guide on how to add a custom location on your Instagram.
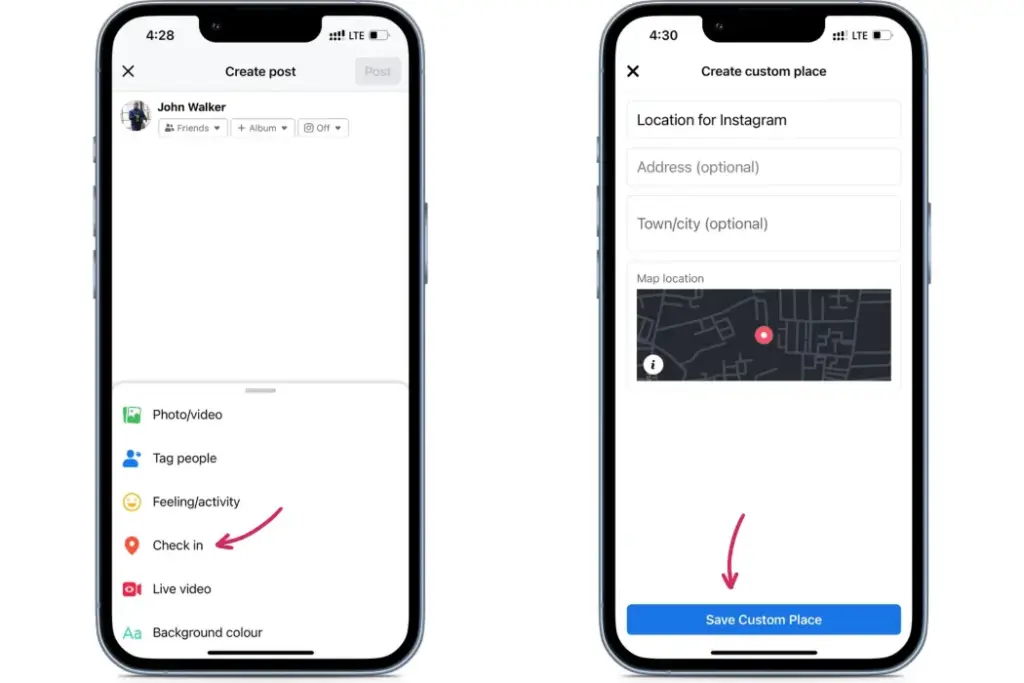
Step 1: Go To Your Facebook Account and Tap Check in
Since Instagram is owned by Meta, all location tags are sourced from Facebook’s database. To create a custom location, you first need a Facebook account.
- Log in to your Facebook app or create a new account if you don’t have one.
- Click on the “What’s on your mind?” status bar to create a new post.
- Tap Check-in and start searching for your location.
If your desired location does not appear, you’ll need to create a new one.
Step 2: Enable Your Location Services
To create a custom location, location services must be enabled on your phone.
- On iOS: Go to Settings > Privacy & Security > Location Services and ensure Facebook has access.
- On Android: Go to Settings > Location and allow Facebook to use your location.
This allows Facebook to detect your exact coordinates, making it easier to add a location manually.
Step 3: Create a Custom Place by Tapping on “Add a New Place”.
- After selecting Check-in, scroll down and tap “Add a New Place”.
- Enter the place name exactly as you want it to appear on Instagram.
- Fill in the exact address and adjust the pin on the map to ensure accuracy.
Tip: If you’re adding a business location, make sure the name is consistent across all social media platforms for branding purposes.
Step 4: Claim Your Custom Location
Once your custom location is added, you need to claim it to make it official.
- Search for your location in the Facebook search bar.
- Click on it and select “Claim this location” (this is essential for businesses).
- Provide business verification details, if necessary.
After claiming, the location should be available for use across all Meta platforms, including Instagram.
Step 5: Start Tagging Locations on Instagram Posts
Now that your custom location is live, it’s time to start using it!
- When posting an image, video, reel, or story on Instagram, tap “Add Location”.
- Search for your custom location and select it from the list.
- Double-check to make sure it’s the right one before sharing your post.
Encourage your followers to tag the location when posting about your business or event. The more people use it, the more visible it becomes in Instagram’s location search.
Creating a custom Instagram location takes just a few minutes but can make a big difference in discoverability. Try it today and start tagging!
With Predis.ai's AI generator for social media, effortlessly create compelling posts that resonate with your audience.
Can I Create a Location on Instagram without Facebook?
While you can’t create custom locations directly on Instagram anymore, you can still leverage location tags to your advantage. Here’s the breakdown:
- Existing Locations Only: Currently, you can only tag locations that Instagram already suggests. This means using existing, pre-created places.
- Help from Others: The good news is that many brands and users create interesting and relevant locations you can take advantage of. Keep an eye out for these when tagging your posts.
- Business Profiles: If you have an Instagram business profile, you can directly add your address to your profile. This makes it easier for people to find your physical location.
- Reporting Incorrect Tags: Someone can’t remove a location from Facebook itself, but you and others can report it if it’s wrong or violates Instagram’s terms.
- Patience with Appearance: Location tags typically show up on both Facebook and Instagram right away, but there might be a short delay in some cases.
- Choosing the Right Category: For easier search, pick the most relevant category for your location. For example, a cafe would choose “restaurant.”
- Precise Location Selection: When tagging your location, accuracy is key. Ideally, do this while you’re physically at the location you want to tag.
If Instagram ever updates its location features, it may allow users to add locations independently, but for now, Facebook is the only route.
What To Do When You Can’t Establish a New Location on Instagram
Normally, when you create a location, it becomes accessible on Facebook and Instagram instantly. However, there are times when it may take a while or not show up at all. But don’t worry! Here are some solutions for you.
1. Wait for the new location to appear on Instagram.
Sometimes, it takes a bit of time for tags to become visible. For instance, when we tested this, it took four days for a location we created to show up on Facebook and Instagram. However, if your custom location hasn’t appeared yet, you can try the following solutions:
2. Disable location settings on your phone
Facebook might restrict the creation of new location tags for places far from your actual location. If you need to create a tag for a different place, try turning off location settings on your phone.
3. Enable location settings if you can’t see nearby locations
When browsing Instagram, you typically see locations close to your current location. If you’re unable to see nearby locations, ensure that location settings are enabled on your phone.
4. Publish a post with your custom location tag
Posting on Facebook with your custom location tag isn’t necessary to make it available on Instagram’s location list. However, it could help if your geotag isn’t appearing.
5. Assign a category to your Instagram location
When creating or editing your new location, specifying a category may help it appear on Instagram and assist users in finding you. For example, if your tag is for a shop named “Pinpay,” specifying that you sell clothes could improve visibility when users search for clothing.
Untagged locations often get rejected. To add a category, create a tag and post something with it first.
- Select the created location.
- Access the three-dot menu.
- Choose “Suggest Edits.”
- Click on “Add category” in the Category section.
- Select a category from the suggested list. Click Save.
Include a custom location in your Instagram bio. While waiting for your address to appear on the list, you can add a location to your Instagram bio. You can almost freely choose the location you want and include a ZIP code or your company name.
This custom location will be a clickable link that Instagram users can follow. However, it will redirect them to a map app, not to a page with posts. Although it operates differently from creating a custom location for posts or stories, it serves as a viable option while waiting.
6. See if you entered the correct address
If you type a wrong address that does not match the actual location, then Instagram might reject the address that you entered.
To avoid this from happening, check if your address has any spelling errors, incomplete words, or formatting. If any, rectify them, and your address should pop up immediately.
7. Connected to a Personal Account
If your account is a personal one, then you will not be able to attach a business location to the post. Because personal accounts are designed for individual usage, they do not come with advanced features that are usually provided for business pages.
To navigate this issue, see if you are logged into the right account. If you have the right account, then try converting your account to a business profile.
8. Instagram is not connected to Facebook
This issue can also arise if your Instagram account is not connected to your Facebook account. This is because Facebook plays a crucial role in creating custom locations. So, check if your Instagram is connected to your Facebook account before trying again.
Sell More via Instagram 💰
TRY FOR FREE
If all else fails, then try contacting Instagram support for additional support.
Pros of Having Location Tagged on Your Posts
Some of the pros of having location tags on your posts are:
- Boosts business visibility through local discovery
- Can indulge in geo-targeting marketing methods
- Helps users find your location easily
- Can be used in event promotion
Conclusion
Whether you’re tagging a popular spot or creating a custom location for your brand, location tags help make your content more relevant and easier to find. Adding a location to your Instagram posts and stories is a great way to boost engagement, improve discoverability, and connect with your audience. If you want to add a new location, using Facebook’s Check-in feature is the easiest way to do it.
For businesses, location tags are a powerful tool for increasing foot traffic, improving visibility, and making your brand more recognizable on Instagram. So, start using location tags in your content and watch your reach grow!
Need a quick and easy way to create engaging Instagram posts? Predis.ai helps you generate high-quality social media content, complete with optimized captions and the perfect hashtags – all in just a few clicks. Sign up today and level up your Instagram game effortlessly!
Follow our blog for more tips and strategies on how to build an effective Instagram marketing strategy and accelerate business growth.
FAQs
This is a location created from scratch by a user, which can be connected to their business or personal spaces, such as a home.
Unfortunately no. You cannot add a new location to Instagram, but you will need to create a custom location via your Facebook account. Once you have created the custom location on Facebook, you can tag it to your Instagram account.
Location tagging is beneficial to drive SEO and discoverability for your personal or professional brand.
You may also like,
Set up an auto-reply on Instagram
Create an Instagram brand identity
Instagram content ideas for makeup
200+ Unique Instagram Location Ideas