Is your business missing out on Instagram’s goldmine? Instagram reels are where the action is. They have the highest reach and impression rates as compared to other content types. Hence, it’s no surprise that brands are turning to Reels to increase their digital footprint.
But with all this hype, there’s still a lot to figure out, especially when it comes to scheduling Reels in advance. If you’re a business or a creator who plans content ahead of time, you’ve likely hit a wall trying to schedule your Reels. Fortunately, there are methods to sidestep this issue.
In the following sections, we’ll get into the details of why you can’t schedule Reels on Instagram directly and, more importantly, how you can bypass this limitation to keep your content strategy on track. We’ll cover the possible reasons behind the scheduling hurdle and guide you through the steps to schedule your Reels on Instagram successfully.
The Importance of Planning – Why Schedule Instagram Reels?
For some time, let’s hit pause on the frustration of not being able to schedule Instagram Reels. Instead, let’s focus on why scheduling them is such a big deal. Why go through the trouble of planning ahead? Here’s the thing – scheduling your Reels can seriously strengthen your content game.
Studies show that the best times to post Instagram Reels vary during the week. For example, on Sundays, it’s 7 p.m. From Monday to Thursday, it is between 9 a.m. and 12 p.m., and on Saturdays, it’s 9 a.m. These are the moments when your audience is most likely to be active.
Yet, keeping up with these precise times can be challenging if you’re not constantly on your phone. This is where scheduling becomes essential. By setting up your Reels in advance, you make sure they’re published at the optimal times, even if you’re not online. Now since your Reels are being aligned with the audience’s activity pattern, the reach rate and engagement rate increase.
The crux is scheduling your Reels helps you capitalize on peak engagement times so that your content gets the attention it deserves.
Can’t Schedule Reels on Instagram? – Reasons Explained
Can’t schedule Reels on Instagram directly or Running into trouble trying to schedule Instagram Reels? This might be happening due to the following reasons:
1. You Are Using a Personal Account
First off, check whether you’re using a professional account on Instagram. Meta, Instagram’s parent company, restricts the ability to schedule Reels to professional accounts.
It has most likely placed this restriction to prevent bots from scheduling posts, which could flood the platform with spammy content.
Therefore, you’ll need to switch to a business or creator account to access Instagram’s Reel scheduling feature.
2. Outdated Apps
Another reason you can’t schedule Reels on Instagram is that your Instagram or Meta Business Suite apps aren’t updated to their latest versions. Meta regularly rolls out updates to fix bugs and enhance features, so running outdated versions might cause issues with scheduling Reels.
A quick app update might be all you need to solve the problem.
3. Cache and Cookies Issues
If your apps are up-to-date and you are a professional account user, but you’re still having trouble, your browser might be the culprit. Sometimes, cached data or cookies can mess with how the Business Manager functions.
Try clearing your browser’s cookies and cache before logging back in. This often resolves lingering issues and gets things working as they should.
4. Instagram API Limitations
If you manage multiple accounts or post very frequently, you might hit Instagram’s API limits. Instagram restricts the number of actions (like auto-posting or scheduling) that can be performed within a certain timeframe to prevent spam.
If you’ve reached these limits, you’ll need to wait before you can schedule more Reels.
5. Third-Party App Conflicts
Certain third-party apps don’t fully integrate with Instagram’s API. If you use them to manage your Instagram account, they might interfere with the native scheduling features.
In such cases, uninstalling or disabling these apps might resolve the conflict.
Using the Instagram App to Schedule Reels
One of the obvious ways to schedule a Reel on Instagram is by using the Instagram app itself. But before you schedule a Reel using this feature, here are certain things that you must know:
- Make sure you have a professional (business or creator) account on Instagram to schedule Reels.
- You can schedule up to 25 posts or Reels per day
- You’re allowed to schedule content up to 75 days in advance
- When scheduling crossposts, the selected page for crossposting is locked in place
- Any modifications to your account type, crossposting page, or link type will prevent your post from being scheduled
- Your current privacy and audience settings will be respected when your scheduled Reel is published
Steps to Schedule a Reel Using the Instagram App
Now that you know what to ascertain and what to expect when scheduling your Reel through the app, follow these steps to schedule Reels on Instagram:
Step 1: Launch Instagram App
- Open Instagram on your mobile device, tap the “+” icon to create a new post, and select “Reel.”
Step 2: Prep Your Reel
- Choose the Reel you want to schedule. Complete the setup by adding a cover image, adjusting the frame size, writing a caption, tagging people, setting the audience, adding music, and including a location, among other options.
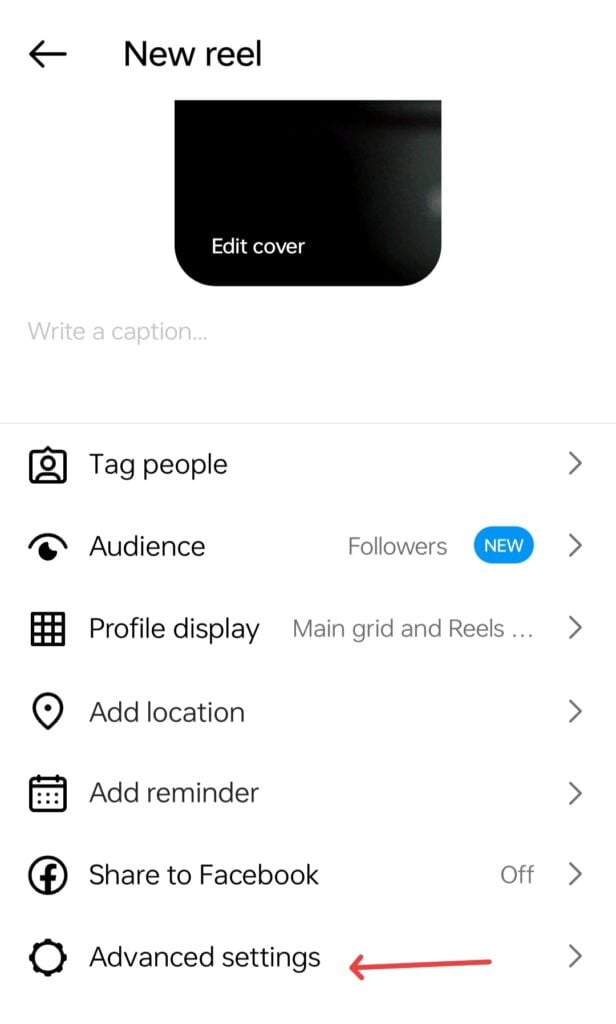
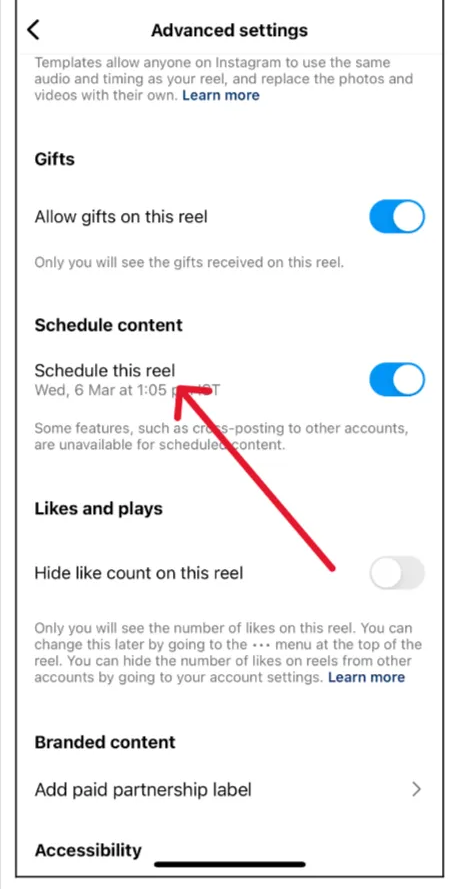
- Once all details are finalized, look for the “Advanced Settings” option for iOS and the ”More Settings” option for Android devices.
Step 3: Access Scheduling Options
- In the “Advanced Settings,” enable the “Schedule This Reel” feature. Then, select the desired date and time for when you want your Reel to be published.
Step 4: Finalize Scheduling
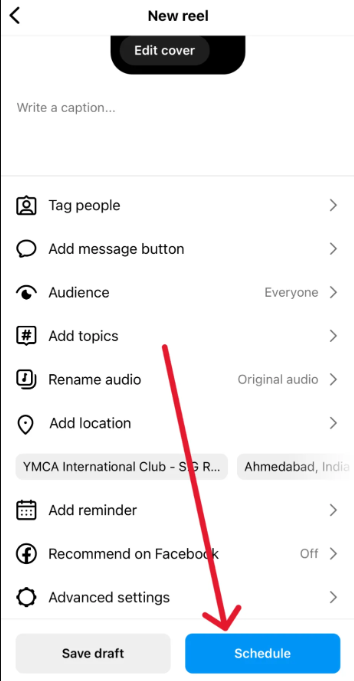
- After choosing the date and time, tap “Done” and then hit the “Back” button. Your page will now display a “Schedule” button. Tap this button to complete the scheduling process.
Steps to Manage the Scheduled Reel on Instagram App
You can manage the scheduled content in two ways, these are as follows:
1. Managing from Your Instagram Profile
- Click on your Instagram profile.
- Tap the three horizontal lines in the top right corner > “Scheduled Content.”
- Tap the ”…” icon next to the Reel you want to edit.
- You can then choose to “Reschedule,” “Share Now,” or “Delete” the content.
2. Managing from the Create Section
- On the Instagram app, tap the ”+” icon > “Post” or “Reel.”
- Click on “Scheduled” to see your list of scheduled content.
- Select the post or Reel on Android or tap “Next” on iOS device to make changes.
- Once again, you can opt to “Reschedule,” “Share Now,” or “Delete” the content.
#Please Note: Currently, scheduled content does not support features like sponsored posts, fundraisers, product tagging, or collaborative posts.
Using the Meta Business Suite to Schedule Instagram Reels
The Meta Business Suite often stands out as the preferred option compared to the Instagram app when it comes to scheduling Instagram Reels.
Here’s how to schedule your Reels using Meta Business Suite:
- Log in to your Meta Business Suite account > Access dashboard > Click on the “Create Reel” button to kick things off.
- Choose the page where you want your Reel to appear. Upload your video, add a caption, add some relevant hashtags, and pick a good thumbnail. If you need others to help out, you can invite them here.
- After uploading your video, take a moment to review and tweak it if needed. Make sure everything looks just right.
- Finally, hit “Next” and then “Schedule.” Pick the best date and time for your Reel to go live. Using Meta Business Suite, you can schedule from 20 minutes to 29 days in advance.
#Please Note: Meta Business Suite only allows scheduling for Reels that are 90 seconds or shorter.
In addition to these two methods, businesses and creators can also use third-party tools to schedule their Reels on Instagram. Such third-party tools often provide far more robust and comprehensive editing and scheduling tools.
Must-Know Limitations for Scheduling Instagram Reels
- The Instagram app doesn’t support bulk scheduling. You’ll have to schedule each Reel individually.
- Unfortunately, when you schedule a Reel on Instagram, you can’t automatically crosspost it to your Facebook account. You’ll need to post separately on each platform.
- Similarly, you can’t share your scheduled Reel on other platforms simultaneously. It’s strictly an Instagram-only affair unless you manually share it elsewhere.
- When scheduling reels, collaboration features are not available. This can be a headache for creators who often partner with others.
- Instagram’s native scheduler does not offer advanced editing tools. If you need to make significant changes, you might have to delete and start over.
- The option to tag products is absent while scheduling your Reels using Meta Business Suite.
Things to Keep in Mind While Scheduling Instagram Reels
Take note of these extra tips while scheduling Instagram Reels:
- Watch Your Audience’s Activity
Scheduling is great, but don’t forget to keep an eye on when your audience is most active. People’s habits change, so it’s smart to revise your schedule based on when your followers are actually online. - Quality Over Quantity, Always!
It’s tempting to push out a lot of content when you have scheduling tools at your disposal. But remember that delivering valuable and interesting Reels will always have a bigger impact than posting frequently without purpose. - Experiment with Timing
Don’t get too comfortable posting at the same time every day. Mix it up! You might find that your audience is more engaged at a time you hadn’t considered. It’s all about trial and error. - Stay Flexible
Life happens, and trends pop up unexpectedly. If something relevant or timely comes along, don’t be afraid to shuffle your schedule and post something that’s more at the moment. Your followers will appreciate that you’re staying current. - Use a Content Calendar
Organizing your upcoming Reels in a content calendar can help you maintain a balanced and cohesive feed. It also makes it easier to plan ahead for holidays, events, or product launches. - Plan to Engage
Posting is just the first step. After your Reel goes live, be ready to engage with your followers. Responding to comments and interacting with viewers can really improve your Reel’s success and build a loyal community. - Stay Trendy But Authentic!
Trends can give your Reels a nice push, but always stay true to your brand. If a trend aligns with your message, go for it. But if it doesn’t, it’s better to pass because authenticity wins in the long run. - Learn from Your Peers and CompetitorsTake a look at what others in your industry are doing. By observing their successes and mistakes, you can gain inspiration and identify effective strategies. Then, you can tailor those insights to your brand or business.
The Key Takeaway
The key takeaway is that Instagram’s native tools have limitations in scheduling Reels, such as restrictions to professional accounts, daily limits, and a lack of advanced features. However, there are still ways to plan and post your content effectively.
Also, to use these tools to schedule your Instagram Reels, you must have a professional or creator account. You cannot schedule Reels on Instagram using a personal account.
Lastly, you can use alternative tools to make sure your Reels are posted at the optimal times and that you have access to comprehensive editing tools.
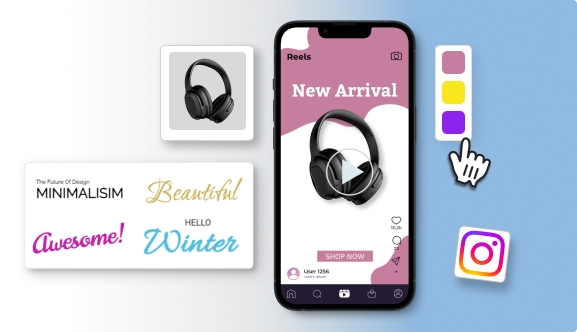
Create stunning Instagram Reels effortlessly with Predis.ai’s free Instagram Reels maker. Choose from a variety of reel templates designed for every occasion.
Simply provide a one-line input about your business and the type of reel you want, and Predis will customize the perfect video for you.
